Pages: 1 2 3 [4]   Go Down

Author Topic: The x-y Easel - stepping easel for art repro  (Read 32056 times)

Bart_van_der_Wolf

  • Sr. Member
  • ****
  • Offline Offline
  • Posts: 8914
Re: The x-y Easel - stepping easel for art repro
« Reply #60 on: July 04, 2016, 03:46:20 am »

Good luck but to me it is a solution for a problem that doesn't exist. Unless the artwork was huge I would always capture in one click.

Hi Bob,

Maybe you've overlooked the explanation that it produces higher quality images because a) one can stitch image tiles that were taken with higher magnification/resolution, and b) a smaller section can be better lit with constant angles of illumination.

Cheers,
Bart
Logged
== If you do what you did, you'll get what you got. ==

BobShaw

  • Sr. Member
  • ****
  • Offline Offline
  • Posts: 2218
    • Aspiration Images
Re: The x-y Easel - stepping easel for art repro
« Reply #61 on: July 04, 2016, 04:33:43 am »

Hi Bob,

Maybe you've overlooked the explanation that it produces higher quality images because a) one can stitch image tiles that were taken with higher magnification/resolution, and b) a smaller section can be better lit with constant angles of illumination.

Cheers,
Bart
No, I wasn't.
If you are doing art reproduction then you have a camera with the resolution to produce a print the size of what that easel is capable and you should be able to evenly light it.

To me stitching is something you doing when you really have to because it introduces distortion. As pointed out somewhere artwork (in fact most things you are going to study close up) may not stitch correctly. Much better to have the artwork horizontal or vertical anyway.
Logged
Website - http://AspirationImages.com
Studio and Commercial Photography

teddillard

  • Sr. Member
  • ****
  • Offline Offline
  • Posts: 717
    • http://www.teddillard.com
Re: The x-y Easel - stepping easel for art repro
« Reply #62 on: July 05, 2016, 04:38:01 pm »

@ Bob -

Where the heck were you back 5 years ago when I started this?  You could've saved me a ton of work.  ;)

Seriously, though, where I live, this is a huge issue.  I shoot for artists, museums, collectors...  the whole impetus for this project was one of my best clients simply not being happy with results from traditional tools and methods.  (Read: medium format backs, Betterlight, and, pretty much the top of the heap, the Cruse Scanner, used by no less than museums like the Getty. I was a dealer.  I've used them all.)  When I have a good client who's unhappy with the results from the Cruse, I have to assume there's a problem.  Working with him, and pressing a lot of the 30+ years experience I have with shooting paintings into play, we realized this is the solution...  and, as far as I've been able to see, the only solution.  Shoot a small frame, light it properly. 

I've written a ton about it on my blog, feel free to check it out: https://teddillard.wordpress.com/category/fine-art-reproduction/  I just bought a new painting that would be a great example of how lighting affects rendering of brush stroke...  if I have time I'll post examples for you, though on my blog I've already done that and more.

A couple of notes.  If stitching introduces distortion, you're doing it wrong.  Resolution isn't even part of the issue.  It's all about the lighting.  "Even" lighting misses the entire point.  When you're lighting a painting, you're lighting a three-dimensional subject.
 
« Last Edit: July 05, 2016, 04:52:07 pm by teddillard »
Logged
Ted Dillard

BobShaw

  • Sr. Member
  • ****
  • Offline Offline
  • Posts: 2218
    • Aspiration Images
Re: The x-y Easel - stepping easel for art repro
« Reply #63 on: July 05, 2016, 06:15:31 pm »

When you're lighting a painting, you're lighting a three-dimensional subject.
When you are lighting most things they are three dimensional.  (:-) I spend ages trying to make the print look three dimensional too.

If it provides the solution you need then it is worthwhile. The customer is always right as long as they have the money.
I will check out your blog.
Logged
Website - http://AspirationImages.com
Studio and Commercial Photography

teddillard

  • Sr. Member
  • ****
  • Offline Offline
  • Posts: 717
    • http://www.teddillard.com
Re: The x-y Easel - stepping easel for art repro
« Reply #64 on: July 05, 2016, 06:47:01 pm »

When you are lighting most things they are three dimensional.  (:-) I spend ages trying to make the print look three dimensional too.

Exactly.  So, for the sake of discussion, let's say I want to light a painting with a single light, to emphasize the depth and texture of the brush stroke.  I want a simple shadow, very little fill.  I want this because I want the print to have depth and dimension.

As you undoubtedly know from lighting any dimensional subject, if you add light sources, you're multiplying shadows, right?  4 lights, 4 sets of shadows. 

Lighting a painting with a single light source is not a problem, when you use a small frame area and step the painting.  A spot, say 6' away, covers a 16x20" field with no problem, and a field-evening software like Equalight balances it out.  I have brush strokes with simple, distinct shadows, realistic highlights, as the artist saw them.  I take several samples of the painting, and my stitching software goes a little further to even out the field as well. 

The result, regardless of the size of the painting (and I've done this with well over 60" paintings) is an entire painting with the surface lit perfectly - using just one light source.  Virtually every brush stroke is lit identically throughout the work.  Lighting a large painting with a single light source without stepping the painting is near impossible.

That goes a long way to helping your print look 3-dimensional. 
« Last Edit: July 05, 2016, 06:53:57 pm by teddillard »
Logged
Ted Dillard

BobShaw

  • Sr. Member
  • ****
  • Offline Offline
  • Posts: 2218
    • Aspiration Images
Re: The x-y Easel - stepping easel for art repro
« Reply #65 on: July 06, 2016, 02:07:09 am »

Ok, you have my attention. I've read the blog.
We seem to have stepped from the technicality of doing the reproduction into the creative side of the art.

to emphasize the depth and texture of the brush stroke.

If I said to most artists I know that I wanted to emphasise their brush strokes then they would probably say that if there is any emphasising to be done, they will do it.
So not sure about some of this.

The colour of the light in the artists studio or direction it was coming from or how they felt at the time is not something (I feel) that the photographer can concern themselves with. We can only reproduce what is there on the canvas. I can only measure the colour that is there (indirectly using a Colour CheckR) and reproduce that. If I do that accurately then side by side with the original, in any light, they will look the same.

The same goes for shadows. If the original and the reproduction are side by side in the gallery they should look the same. Every gallery will have lights coming from above, and so the shadows should be below, or not at all. Also there will be more light at the top if it is a large painting. It will also slope forwards. If the light is from above and the introduced shadows are from the side then it will look wrong. This is just an observation of reality, not a solution. Obviously if the artist has painted in a shadow then an additional shadow elsewhere would also look wrong.

So, what to do about shadows? I would say a very slight shadow below, that is, light from above, or no shadow at all.
4 lights don't necessarily make 4 shadows. If the lights face each other and are of equal power then there will be no shadow. I generally use a clam shell type arrangement of long strip boxes where each light is at right angles to the painting and they face each other. You can adjust the power ratio to vary the shadow.

Anyway, good luck.
Logged
Website - http://AspirationImages.com
Studio and Commercial Photography

teddillard

  • Sr. Member
  • ****
  • Offline Offline
  • Posts: 717
    • http://www.teddillard.com
Re: The x-y Easel - stepping easel for art repro
« Reply #66 on: July 06, 2016, 06:24:52 am »

Due respect, but this: "If the lights face each other and are of equal power then there will be no shadow." ?  No, and that's Lighting 101. I'd say if you think this is true, try lighting a pingpong ball with 4 lights and show me where the shadows go away... 

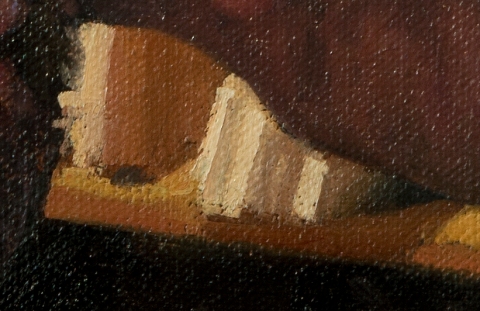
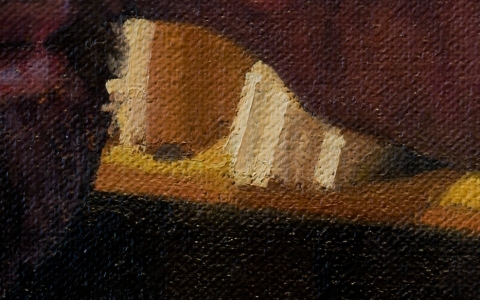
You're missing my point on the brush stroke.  Sure, the artist gives it the texture they want, that's exactly the point.  My job is to reproduce that texture in a print - no more or less.  Here are two examples - shot with standard "even" side lighting, and shot with the artist's studio lighting:


To see the full sized images go to the blog post, here: https://teddillard.wordpress.com/category/fine-art-reproduction/

Notice, in particular, that vertical brush line in the tan/beige tone in the center.  The top image, lit traditionally and "technically correct", doesn't read the line of the stroke.  The second shot defines it as the artist saw it when he painted it.  It's subtle, I'll grant that, but it's important. If you look in other areas you'll see strokes and paint you can't even detect in the first example.

Anyway, I've done the science on the color on my blog (and in several years of research and testing - I'm an X-Rite "Coloratti", or at least was at one time...  worked pretty closely with members of that team. http://blog.xritephoto.com/2012/06/ted-dillard-light-sources-color-management/#sthash.Vd20So0F.dpbs). Again, respectfully, you're missing the point about that, as well as in the quality of the shadow and lighting.  As simply put as I know how to say it, if you light a subject with green light, and only green light, how can you expect it to reflect red?  The subject will only reflect the wavelengths you give it, though you can try to fabricate a response with a profile, as you are forced to do with "full spectrum" fluorescent.  I use as full a spectrum as I can - daylight with tungsten added - because without a full spectrum, I don't get a full palette of actual colors to print.

As far as shadows go, interestingly, in a North Light Studio the shadows under each stroke typically move to very cool, if not blue.  You can see that pretty clearly with a white paint stroke, naturally.  ...but, point being, I can make the shadows do whatever I feel they need to be doing, in color as well as values. 

I'd suggest you do an few tests, since no amount of discussion really convinces anyone. Well, it never convinced me, anyway...  ;) 

Shoot a painting with a good, heavy texture paint application.  To take the x-y easel out of the equation, let's use a small painting.   
1) Light it with standard, two light copy lights, with or without polarizers, whatever your preference. 
2) Shoot another version with 4 lights, again, standard copy arrangement. 
3) Shoot it with a daylight, North light studio with not more than two down-spots, preferably halogen.  Make sure you process using your Passport system, it handles that mix great. 
4) For the sake of some real interesting discussion, shoot the piece with LED lighting, pick your poison as to the lighting technique - then look at that file's histogram compared to the histogram from #3 - look at all 3 channels.  (https://www.youtube.com/watch?v=QcpGsLhp6K0)

Shoot, process, and look at the files at "Print Size".  Now look at the images zoomed in until you can see the detail of the brush strokes and shadows on them. 

Make some prints.  Note the differences between the color range with the North Light studio lighting, particularly with a painting with difficult, gamut-stretching color.  If possible, show the prints to the artist and see what they like best.  Come to your own conclusions... 

(Yep, it's a lot of work, I know because I've done all of that, for several years, as well as running some actual science.  :)  I've also proven out the "theory" with about 5 years of using the method and hearing artists' reactions...  that's when I hear about the photographers they used to use, who "never really got it right".  My pricing, by the way, is no more expensive than most lab's standard "high resolution" capture.) 

My conclusions are that a North Light studio emulates the lighting that the painting most often is viewed under, both in quality and in color.  Virtually every gallery I've ever been to has a combination of halogen spots and ambient daylight fill.  Most artists that I work with work under similar conditions, with ambient daylight, and work lights or halogen spots - even when they say they have a North Light studio, they still add the task lighting.  If I shoot that way, my lighting looks familiar to the artist, and the color of the capture is easier to print. 

---back to the x-y easel, now ---

Now, let's assume you agree, and want to use that lighting formula on a large, 3' x 5' painting.  How would you do it?  If you try to light the whole work like that, you're going to get huge drop-off from your fill - maybe up to an entire stop, depending on how far you are from the North "light".  No single halogen bulb I know of is going to light that area evenly, or even within a stop, from the center of the hot spot to the fringe.  If you add more lights, you add more shadows, and the stroke and texture gets confused. 

Thus, the 16 x 20 (actually 24", with the D800) frame. I can light it correctly, and "apply" that lighting over the entire surface of the painting, by stepping the work and not the camera. 

As a maybe kind of interesting aside, watch how artists work some time.  Though they do, in most cases, step back and appraise the work from a distance, they're generally working within arm's length of a painting.  Their field of vision is - you got it - about a 16 x 20 frame.  They move the work, on the easel or the studio floor, around so that the area they're working on falls under the task lighting they're using.  For all intents and purposes, their field of view and work area is coincidentally just about identical to my capture area, both in size and lighting treatment.  Again, I'm making a capture exactly matching how they've looked at their work throughout it's creation.  This may seem academic, but first, it's been demonstrated again and again, and, second, guess what distance most artists end up evaluating my full-scale prints from? That's right.  Arm's length, no matter the size.


** Note: I'm about ready to wrap up the prototype easel and move it into the studio for testing against my first motorized version, so I'm thinking this thread may have run it's course.  I'm hesitant to start a thread about the entire technique, since I've spent countless hours documenting the process over the years on my site, along with some videos et al, but if there's interest, maybe we should do that in another thread?  I'll leave it up to y'all, but I'm not sure this is the category for the discussion... 

Thanks for the interest!
« Last Edit: July 06, 2016, 08:25:26 am by teddillard »
Logged
Ted Dillard

teddillard

  • Sr. Member
  • ****
  • Offline Offline
  • Posts: 717
    • http://www.teddillard.com
Re: The x-y Easel - stepping easel for art repro
« Reply #67 on: July 10, 2016, 10:22:42 am »

aaaaaand we're ready for the studio!   ;D


Logged
Ted Dillard

teddillard

  • Sr. Member
  • ****
  • Offline Offline
  • Posts: 717
    • http://www.teddillard.com
Re: The x-y Easel - stepping easel for art repro
« Reply #68 on: July 11, 2016, 04:43:00 pm »

I've had a chance to do some shooting today, and what walks in the door but a 60" tall painting.  The math works - using the D800 vertically, it tracks out to 60" no problem. 

...and the thing works AMAZINGLY well, if I do say so myself.   ;)
Logged
Ted Dillard

teddillard

  • Sr. Member
  • ****
  • Offline Offline
  • Posts: 717
    • http://www.teddillard.com
Re: The x-y Easel - stepping easel for art repro
« Reply #69 on: July 13, 2016, 11:59:38 am »

A few shots of the final configuration in the studio, in use:

The 12V DeWalt battery power supply, motor control and drive wheel:


This is the bottom clamp tray for the painting - extra-wide, several mounting possibilities, along with a little storage tray (for the Colorchecker, of course :) :


The side standard, showing the magnetic scale on the side, the vertical drive screw and the position of the power supply:


This is the screw assembly for the vertical rise - pay no attention to the blade burns on the angle braces, I didn't feel like swapping out to a rip blade that day.   :o :


This shows the dual rail assembly, which is what allows an 80" canvas:


At this point, about the only thing I can think to add would be a shutter release button on the remote.   8)
Logged
Ted Dillard

teddillard

  • Sr. Member
  • ****
  • Offline Offline
  • Posts: 717
    • http://www.teddillard.com
Re: The x-y Easel - stepping easel for art repro
« Reply #70 on: July 14, 2016, 06:03:33 am »

OK, folks - time to step off the thread.  I've put it through all the testing and it rocks!  ...better than I dared hope.  I'll try to check in with this thread, but I can't promise I'll be looking regularly.

I've updated the site to include the "Servo" model: https://xyeasel.wordpress.com/

Please feel free to contact me through the site, or message me here if you're interested.  I'm working on pricing and delivery, and will update the site with those details as soon as possible. 

Thanks for the input, and keep those cards and letters coming! 

update: I just started a new thread over here that shows the updated, legit version: http://forum.luminous-landscape.com/index.php?topic=114871.0
« Last Edit: December 03, 2016, 06:45:04 am by teddillard »
Logged
Ted Dillard
Pages: 1 2 3 [4]   Go Up