Pages: [1] 2 3 ... 16   Go Down

Author Topic: ZERO NOISE technique  (Read 412953 times)

Guillermo Luijk

  • Sr. Member
  • ****
  • Offline Offline
  • Posts: 2005
    • http://www.guillermoluijk.com
ZERO NOISE technique
« on: June 25, 2007, 09:07:29 am »

Find the complete article in English here: ZERO NOISE PHOTOGRAPHY

I have tested a technique to completely eliminate noise* on digital images based on the signal/noise ratio improvement achieved through overexposition.
At the same time this technique extremely expands the dynamic range of your image in the shadows (don't think of HDR, it's not like that) and recovers in high detail all textures present in the darkest areas of your image.

* It actually does not eliminate noise at all, just takes for every pixel that one with the best signal to noise ratio. That is why textures are not only 100% preserved, but improved.

To do this you simply need to shoot twice making use of a tripod. One shot will be as usual, keeping highlights unburnt. The second shot with be done with a severe overexposition (I found +4EV to be a good value). A simple piece of software merges those two shoots into one final image with no noise on it and fine detail even in the darkest zones. I have converted my modest 350D in a virtually noise-free digital camera with 12 f-stops of real usable dynamic range.

The development of the technique and results are explained in detail in Spanish here: TECHNIQUE OF THE 4 f-STOPS. If I have feedback from the forum I will take some time on a proper translation of the whole article. Meanwhile find here some of the results:

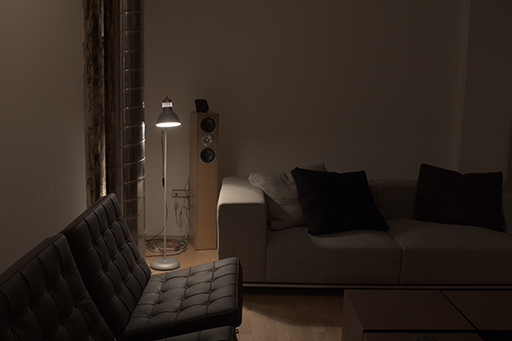
Original shot (the one we would have usually taken, caring of highlights):


Second shot (+4EV with respect to previous one):


Merging result:


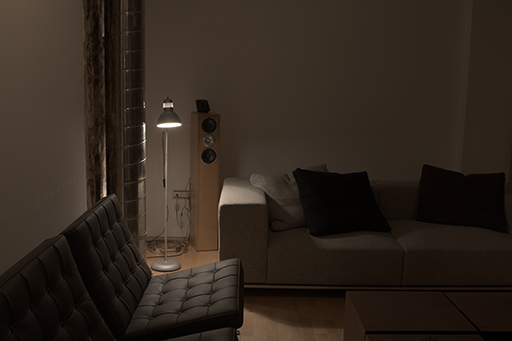
Apparently there is no difference: same tones, bright, contrast. In fact that is what I intended to achieve; unlike HDR programs this method provides a new image with the same appearance as the original one. But let's look closer: first let's analyse the 16-bit histograms:

Original image:


Resulting image:


The quality improvement is very noticeable. Histogram is soft and has no zero values as the original had. Non interpolated levels are much closer thanks to overexposition and that means a lot of tonal richness in the definition of textures.

Let's look now at the improvement in some noise samples in the darkest areas (left=original, right=result):


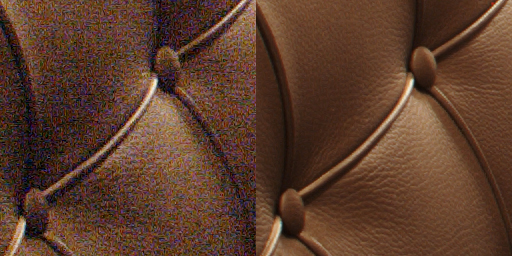
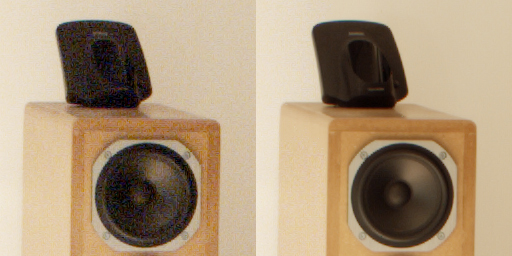
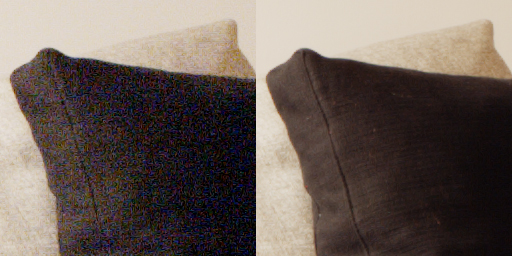
Where usually there was no more than noise, we have recovered perfectly textures that can now be treated using curves or whatever method you like best. Please note that the original shot was done in ISO100 on a 350D; the reason for such a amount of visible noise is no other than these areas of the image are REALLY very dark; I applied the same curve both to the original and processed images to be able to the check the noise improvement.

This is not an all-purpose technique; first of all we need two expositions what requieres some camera stabilization system (tripod). But I think it can improve a lot quality of results in some applications such as:

   - Architecture and interior design
   - Studio still life
   - Landscapes with dark areas
   - Night or low lighting conditions photography
   - High contrast escenes
   - General photography with zone processing in mind

I plan to develop a program to merge N RAW images (not just 2) with arbitrary expositions (not just 0 and +4EV) to automate the process.

Regards.
« Last Edit: October 12, 2007, 04:24:00 pm by GLuijk »
Logged

roskav

  • Sr. Member
  • ****
  • Offline Offline
  • Posts: 254
    • http://www.roskavanagh.com
ZERO NOISE technique
« Reply #1 on: June 25, 2007, 09:51:06 am »

That looks great ... sounds simple too with just two shots to make the image... I can't believe the final outcome ... both of the shots that you took would have had a certain amount of noise.. but the detail in the final image looks great.. almost if you had been using a fill light.  I would certainly use this for my workflow ... what type of program did you make? Is it similar to a lens cast correction program?

Ros
Logged

Guillermo Luijk

  • Sr. Member
  • ****
  • Offline Offline
  • Posts: 2005
    • http://www.guillermoluijk.com
ZERO NOISE technique
« Reply #2 on: June 25, 2007, 10:14:56 am »

Quote
That looks great ... sounds simple too with just two shots to make the image... I can't believe the final outcome ... both of the shots that you took would have had a certain amount of noise.. but the detail in the final image looks great.. almost if you had been using a fill light.  I would certainly use this for my workflow ... what type of program did you make? Is it similar to a lens cast correction program?

Ros
[a href=\"index.php?act=findpost&pid=124764\"][{POST_SNAPBACK}][/a]

I wrote a routine that checks pixel levels in the overexposed image. If the pixel is burnt, I takes it from the other image. If it is not, exposition is corrected and that low noise level is used. It works!

Some more examples:


Looking at dark areas:


« Last Edit: June 25, 2007, 10:17:47 am by GLuijk »
Logged

BernardLanguillier

  • Sr. Member
  • ****
  • Offline Offline
  • Posts: 13983
    • http://www.flickr.com/photos/bernardlanguillier/sets/
ZERO NOISE technique
« Reply #3 on: June 25, 2007, 10:28:20 am »

If you have a Mac version of your utility, I'd be glad to do some testing for you.

Regards,
Bernard

Ray

  • Sr. Member
  • ****
  • Offline Offline
  • Posts: 10365
ZERO NOISE technique
« Reply #4 on: June 25, 2007, 11:24:03 am »

GLuijk,
In what way would you say your method is better than standard blending procedures as outlined in this Luminous Landscape tutorial?

http://www.luminous-landscape.com/tutorial...-blending.shtml
Logged

madmanchan

  • Sr. Member
  • ****
  • Offline Offline
  • Posts: 2115
    • Web
ZERO NOISE technique
« Reply #5 on: June 25, 2007, 11:55:44 am »

Another way to think about this (sort of upside down) is in terms of the expose-to-the-right method discussed here previously. The +4 EV is ETTR. So far, in fact, that the highlights and upper midtones get burned out -- no surprises there. The other image (which has no highlights burnt out) is used to fill in the burnt-out data.
Logged
Eric Chan

EricV

  • Sr. Member
  • ****
  • Offline Offline
  • Posts: 270
ZERO NOISE technique
« Reply #6 on: June 25, 2007, 12:26:22 pm »

I have wondered for a long time why film scanners did not use this technique to achieve extremely high dynamic range (or low shadow noise).  They clearly consider this an important specification, since they all inflate it so much in their marketing   Scanners have no stability problem, so aligning multiple exposures should be easy.  This technique would allow a scanner to deliver a merged image with full 16-bit depth, even if the sensor is capable of only 12-bit depth each pass.   Apparently a few scanners are now starting to do this ....
Logged

haefnerphoto

  • Sr. Member
  • ****
  • Offline Offline
  • Posts: 679
    • http://www.jameshaefner.com
ZERO NOISE technique
« Reply #7 on: June 25, 2007, 12:29:29 pm »

I'd certainly like to know more about it.  Please do the translation.  Thanks, Jim
Logged

pcrov

  • Guest
ZERO NOISE technique
« Reply #8 on: June 25, 2007, 12:41:48 pm »

Quote
I'd certainly like to know more about it.  Please do the translation.  Thanks, Jim
[a href=\"index.php?act=findpost&pid=124789\"][{POST_SNAPBACK}][/a]

Yes, please do. I'm very interested in this.

Cheers,
Paul
Logged

Guillermo Luijk

  • Sr. Member
  • ****
  • Offline Offline
  • Posts: 2005
    • http://www.guillermoluijk.com
ZERO NOISE technique
« Reply #9 on: June 25, 2007, 01:27:42 pm »

Quote
GLuijk,
In what way would you say your method is better than standard blending procedures as outlined in this Luminous Landscape tutorial?

http://www.luminous-landscape.com/tutorial...-blending.shtml
[{POST_SNAPBACK}][/a]

Good question. I have been looking at them, 3 techniques are explained.

First my approach is to provide the same image as the original (no exposition change, no bright change, no contrast change), so that the user can freely use the recovered information in the shades in the way he likes best, but starting from a someway virgin image. Just no noise on it, but expanded dynamic range (I never liked the feeling of HDR techniques).

Secondly, it can work from RAW files, and not only 2 but several of them with any exposition values. With 2 images 12-stops dynamic range is achieved, but with 3 shots 16-stops real dynamic range can be truly achieved with no change in contrast. Allowing change of contrast even more than 16-stops could be obtained, but I think this is too much!

Third is totally automatic, just click a button and wait about 10s for 2 8Mpx RAWs. The result is a 16-bit TIFF file.

Fourth, I plan to offer it for free. If a friend of mine doesn't get to modify the DCRAW source code to perform this algorithm straight into the RAW files before developing them (which would be absolutely fantastic) I will write an application myself. It will read the RAW files but will develop them prior to processing, which is a certain disadvantage compared to my friend's approach.

In fact I already offered a beta simple version for download that takes 2 RAW files with any exposition difference among them and combines into a noise-free output image. Check it here: [a href=\"http://www.macuarium.com/foro/index.php?showtopic=214670&st=25]PROGRAM ZERO NOISE DOWNLOAD[/url]
The program is simple simple, but It's a bit tricky. You will need some Spanish assistance as it works only reading the files from certain folder (c:\ceroruidio\) and needs a DLL to be copied into the PC. I offer there my two dining room RAW files for download and test.
« Last Edit: June 25, 2007, 02:39:31 pm by GLuijk »
Logged

EricV

  • Sr. Member
  • ****
  • Offline Offline
  • Posts: 270
ZERO NOISE technique
« Reply #10 on: June 25, 2007, 03:56:27 pm »

Can you show us a sample image of a region spanning the bright-dark transition, where your program switches image source pixels?  A good example would be a crop including both the bright lamp and the nearby dark speaker from your first posted image.  If the program has any glitches, that is where they will be found.
Logged

Guillermo Luijk

  • Sr. Member
  • ****
  • Offline Offline
  • Posts: 2005
    • http://www.guillermoluijk.com
ZERO NOISE technique
« Reply #11 on: June 25, 2007, 04:03:52 pm »

Quote
Can you show us a sample image of a region spanning the bright-dark transition, where your program switches image source pixels?  A good example would be a crop including both the bright lamp and the nearby dark speaker from your first posted image.  If the program has any glitches, that is where they will be found.
[a href=\"index.php?act=findpost&pid=124824\"][{POST_SNAPBACK}][/a]

sure, here it is:


Black areas are taken from the original image while cyan ones are from the +4EV. The election is done pixel by pixel independently, this is the stronghold of automating this method through software as the idea is not new at all.

Another example from a forum member who tested the program:


On the left side of:

« Last Edit: June 25, 2007, 04:12:00 pm by GLuijk »
Logged

timhurst

  • Jr. Member
  • **
  • Offline Offline
  • Posts: 82
    • Tim Hurst Photography
ZERO NOISE technique
« Reply #12 on: June 25, 2007, 04:14:44 pm »

This result can already be achieved in PS pretty easily using the "blend if" sliders under blending options. Expose one shot for the highlights and one for the shadows, bring the over exposed shot down in the RAW processor so the tonalities are the same, layer the frames in PS and use the blend if tool to reveal the overexposed shot in the shadow regions only to get noise free shadows. As mentioned before the difficult/problematic areas are where there is sensor blooming and fringing.

Does your program offer any advantages to this or is it a similar idea with automation?

tim
Logged

Kenneth Sky

  • Sr. Member
  • ****
  • Offline Offline
  • Posts: 463
    • http://
ZERO NOISE technique
« Reply #13 on: June 25, 2007, 04:21:22 pm »

Can't this be done in CS 3 Extended by taking multiple exposures on a tripod and merging under Automate? However it won't extend the dynamic range.
Logged

Guillermo Luijk

  • Sr. Member
  • ****
  • Offline Offline
  • Posts: 2005
    • http://www.guillermoluijk.com
ZERO NOISE technique
« Reply #14 on: June 25, 2007, 04:31:53 pm »

Quote
This result can already be achieved in PS pretty easily using the "blend if" sliders under blending options. Expose one shot for the highlights and one for the shadows, bring the over exposed shot down in the RAW processor so the tonalities are the same, layer the frames in PS and use the blend if tool to reveal the overexposed shot in the shadow regions only to get noise free shadows. As mentioned before the difficult/problematic areas are where there is sensor blooming and fringing.

Does your program offer any advantages to this or is it a similar idea with automation?

tim
[{POST_SNAPBACK}][/a]

Yeah I pointed that possibility in a forum, as I almost have no idea about PS: select pixels according to their level so those beyond a threshold would be deleted showing the lower layer with the normally exposed image. Could you please try it with my original RAW files? I would be very interested.

[a href=\"http://www.guillermoluijk.com/download/sub.cr2]NORMAL[/url]
OVEREXPOSED

If you can select individual pixels, then I can only see one more problem: RAW developer are usually non-linear, that means that gamma correction and conversion into a space colour are prior to edition, so as the exposition correction (-4EV) to be applied. I wonder if this can reduce perfomance and quality.
A possible solution would be linerar developing like that achieved with DCRAW (in fact my program calls DCRAW from its code).

Best

Guillermo Luijk

  • Sr. Member
  • ****
  • Offline Offline
  • Posts: 2005
    • http://www.guillermoluijk.com
ZERO NOISE technique
« Reply #15 on: June 25, 2007, 04:38:18 pm »

Quote
Can't this be done in CS 3 Extended by taking multiple exposures on a tripod and merging under Automate? However it won't extend the dynamic range.
[{POST_SNAPBACK}][/a]

I must correct this: we trend to call "dynamic range" to those results achieved with HDR software. OK, let's forget for a moment about those tone mapping tools.

Noise is the biggest limitation to record properly detail in the shadows. In this link: [a href=\"http://www.ojodigital.com/foro/showthread.php?t=143407]350D dynamic range[/url] I tested my 350D on a high contrast image and calculated (aprox.) it has a useable dynamic range of 8 f-stops. In the darker shadows noise becomes so noticeable that the 4 lower f-stops that theoretically can be recorded on a 12-bit RAW are unuseable.

But If you clean the noise in those 4 lower f-stops (as this technique does), you are in fact expanding the real dynamic range your camera can record from a scene. I always refer as dynamic range as that of the scene being recorded, not that of my TIFF file. In fact any image with level values from 0 to 65535 should be called as having 16 f-stops of dynamic range, but it is fiction as does not correspond to real scene dynamic range.

If that CS3 option cleans up noise, you can by certain say you are getting more dynamic range.

Check this histogram representation, it's cool: it represents the same escene but shot at 1 f-stop intervals, and representing the true log histogram. As we can see there are 8 f-stops that record properly the scene before noise makes it unusable:


On the right the white wall I was shooting at (it appears green as I developed without applying the white balance that would scale all levels and thus displace the 3 channels).
« Last Edit: June 25, 2007, 04:45:48 pm by GLuijk »
Logged

DiaAzul

  • Sr. Member
  • ****
  • Offline Offline
  • Posts: 777
    • http://photo.tanzo.org/
ZERO NOISE technique
« Reply #16 on: June 25, 2007, 05:55:26 pm »

Quote
If you have a Mac version of your utility, I'd be glad to do some testing for you.

Regards,
Bernard
[a href=\"index.php?act=findpost&pid=124771\"][{POST_SNAPBACK}][/a]

This technique has been around since...a long time. Though it is good to see it get some airing again.

As well as blending two stacked layers you can also blend multiple bracketed exposures in photoshop using the merge to HDR function (which in CS3 also has the benefit of aligning the layers as well if there is small movement). You have the tools on the Mac already. NB in this case it is not about dramatically expanding the captured dynamic range and more about increasing the quality of what is captured.

The biggest advantage of this method is a reduction in quantisation noise in the shadows resulting from low (12-bit) conversion of analogue to digital signal. This gives much smoother tonality in the shadows and is useful for those who like to manipulate there images. The reduction in shot and thermal noise comes from averaging over multiple exposures (as per traditional correlation processes to remove noise in signal processing).
Logged
David Plummer    http://photo.tanzo.org/

Guillermo Luijk

  • Sr. Member
  • ****
  • Offline Offline
  • Posts: 2005
    • http://www.guillermoluijk.com
ZERO NOISE technique
« Reply #17 on: June 25, 2007, 06:31:26 pm »

Quote
The biggest advantage of this method is a reduction in quantisation noise in the shadows resulting from low (12-bit) conversion of analogue to digital signal. This gives much smoother tonality in the shadows and is useful for those who like to manipulate there images. The reduction in shot and thermal noise comes from averaging over multiple exposures (as per traditional correlation processes to remove noise in signal processing).

yeah but in most medium cameras, quantization problems in the lowest f-stops really don't matter as noise make them absolutely useless.

    0EV: 2048 levels, 2048..4095
   -1EV: 1024 levels, 1024..2047
   -2EV: 512 levels, 512..1023
   -3EV: 256 levels, 256..511
   -4EV: 128 levels, 128..255
   -5EV: 64 levels, 64..127
   -6EV: 32 levels, 32..63
   -7EV: 16 levels, 16..31
   -8EV: 8 levels, 8..15
   -9EV: 4 levels, 4..7
   -10EV: 2 levels, 2..3
   -11EV: 1 level, 1

Last four f-stops are flooded with noise as for instance in the -10EV stop, a noise level of 2 would pull any pixel out of that f-stop.
With this technique no averaging is done, just pixel selection. The equivalent (in the 12-bit range) levels table achieved with a +4EV overexposed image is something like:

    0EV: 2048 levels, 2048..4095
   -1EV: 1024 levels, 1024..2047
   -2EV: 512 levels, 512..1023
   -3EV: 256 levels, 256..511
   -4EV: 2048 levels, 2048..4095
   -5EV: 1024 levels, 1024..2047
   -6EV: 512 levels, 512..1023
   -7EV: 256 levels, 256..511
   -8EV: 128 levels, 128..255
   -9EV: 64 levels, 64..127
   -10EV: 32 levels, 32..63
   -11EV: 16 levels, 16..31


In green are marked those f-stops obtained from the overexposed image. Even in the 12th stop there are levels enough to allow heavy edition. And in addition to this the SNR has improved by a factor of 2^4=16, what makes noise on the 350D practically invisible.

And more than 12 f-stops of real dynamic range is truly possible, thanks to the 12-bit to 16-bit conversion. In fact with an additional +8EV overexposed shot, I am sure that 16 f-stops of dynamic range can be recorded. The difficult part is to find in real life such a huge contrast.

jani

  • Sr. Member
  • ****
  • Offline Offline
  • Posts: 1624
    • Øyet
ZERO NOISE technique
« Reply #18 on: June 25, 2007, 08:25:29 pm »

Quote
This result can already be achieved in PS pretty easily using the "blend if" sliders under blending options. Expose one shot for the highlights and one for the shadows, bring the over exposed shot down in the RAW processor so the tonalities are the same,
The emphasized text is the difficult part, at least for the test images provided by Guillermo. At least my meagre skills aren't quite up to matching them well enough to avoid posterization effects.
Logged
Jan

John Sheehy

  • Sr. Member
  • ****
  • Offline Offline
  • Posts: 838
ZERO NOISE technique
« Reply #19 on: June 25, 2007, 09:32:15 pm »

Quote
This technique has been around since...a long time. Though it is good to see it get some airing again.[a href=\"index.php?act=findpost&pid=124850\"][{POST_SNAPBACK}][/a]

Mostly with non-linear data, though, which is more unwieldy.

The best place to do most image math is in the RAW linear state where everything is very simple.
Logged
Pages: [1] 2 3 ... 16   Go Up