I post my astrophotos here about once a week.
I figured I'd take you though exactly how I get these images.
Depending on the target of the night, there are different capturing techniques, and different editing techniques, but here is one I just completed today; The Rosette Nebula.
To make this image, I decided to shoot in Narrow band, using filters that only let in 6nm of the exact wavelength of light. This is normally done shooting through Hydrogen Alpha, Sulfur II and Oxygen III filters. Shooting though these filters, filter out all other light except for a very narrow band or wavelength of light associated with specific gasses. Combining these in different ways makes color images, the best known being the "Hubble Palette", where you make images from the Sulfur II filter the Red channel, images from the Hydrogen Alpha filter the Green channel and images from the Oxygen III filter, the blue channel.
First you get set up for a night of imaging. I completed my backyard observatory a few months ago, so that is easy for me. It used to take about an hour to drag everything out into the yard, set everything up, get the mount Polar aligned and wait for the scope to become thermally stable. Now, all I have to do, is open up the shutter on the dome, connect my computer and I am imaging in less than 10 minutes.
 New RASA 11
 by
Colo CJ, on Flickr
Imaging can take up to 30+ hours, depending on your setup and how "deep" you want to image. The more time in an image, the more detailed and noise free the final image is. I now am using an f2.2 scope, so I can get images in just a couple hours that would have taken my 20-30 hours to get with my last setup.
After getting the images, the fun part begins.
First you have to use a program to "stack" and align the individual filtered images to combine them. This gives you a final set of stacked images, one image for each filter. Then you use another program to combine these seperate black and white images to get a final color image. I use Photoshop for this, but there are dedicated astro programs that do this (some say) better, but they are costly.
Here is the Hydrogen Alpha image after stacking 60 individual 120 second frames. This will be the Green channel in the final image
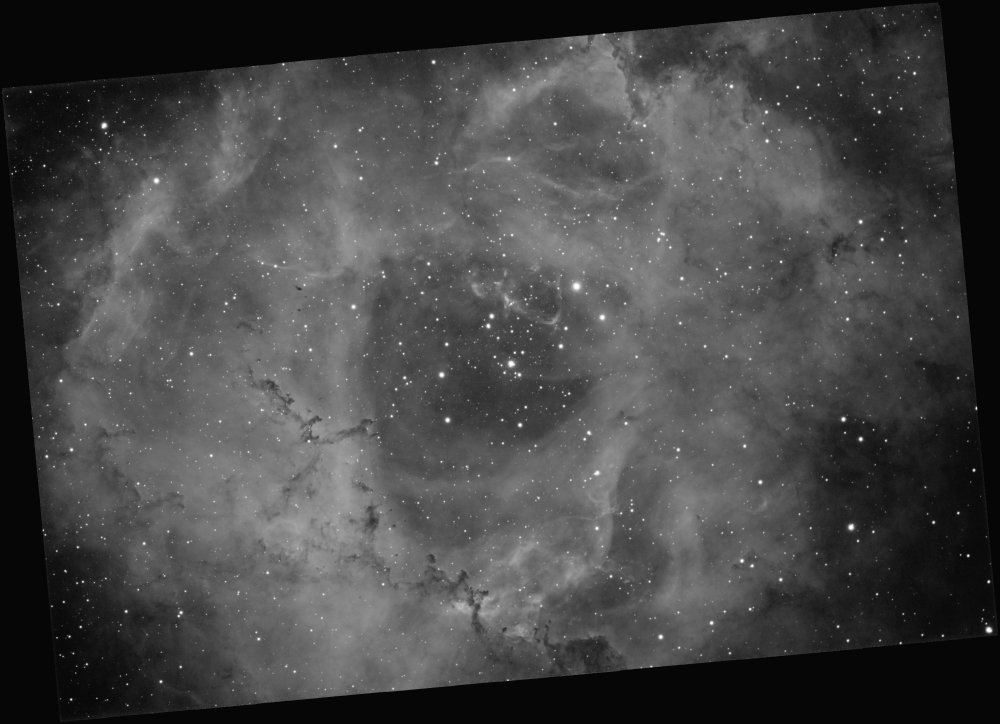 Ha2
Ha2 by
Colo CJ, on Flickr
And here is the Oxygen III image after stacking 35 individual 120 second frames. This will be the blue channel in the final image.
 OIII2
OIII2 by
Colo CJ, on Flickr
For this image, I didn't shoot through the Sulfur II filter. I didn't really have the time and the weather hasn't been very clear. Luckily this nebula doesn't have a huge amount of Sulfur II data, so I used the Hydrogen Alpha and Oxygen III images to create a synthetic Sulfur II image. This will be the red channel in the final image.
 Synth Green
 by
Colo CJ, on Flickr
After combining the three images in photoshop, I get a color image. Many times this image is very dull, depending on the object you are photographing. The data is there, but you have to really pull it out of the image. After all, there is over 1GB of data in this image, you just have to coax that data out.
 SHO Before Editing
 by
Colo CJ, on Flickr
For this image, since I knew I'd have to pull every bit of color and detail as possible out, I edited out the stars. This lets me edit the nebulosity and not bloat the stars. Bloated stars look bad. To get here from the previous image took about an hour of editing. WAY too much to get into specifics, but this is really the fun part for me.
 HST_image2_starless
 by
Colo CJ, on Flickr
I then added the stars back into the image, did a little more color and contrast correction and ended up with this final image (for now).
When the weather cooperates I am going to go back and shoot with a color camera to get the stars the right colors. Here they are too bland. It is hard to get decent color in stars with narrow band imaging, so most shoot a separate color set just for correcting the stars.
Here it is, 3.2 hours of imaging, 1 hour of stacking and roughly 3 hours of final editing.
The Rosette
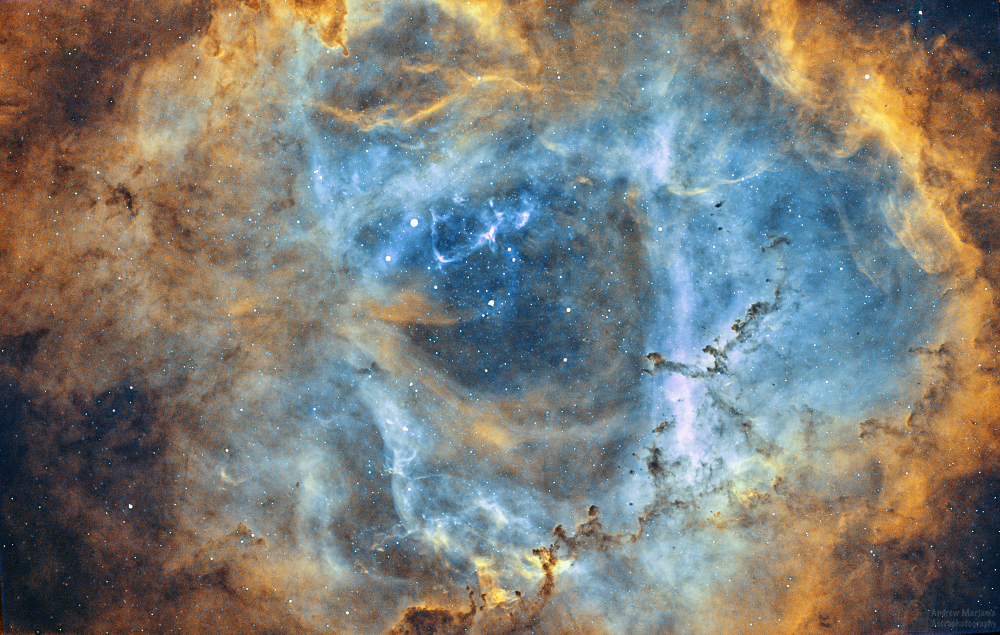 Rosette 3 Hours (S)HO small
 by
Colo CJ, on Flickr
