Pages: [1] 2   Go Down

Author Topic: RRS Panoramic equipment  (Read 19774 times)

Khurram

  • Sr. Member
  • ****
  • Offline Offline
  • Posts: 488
RRS Panoramic equipment
« on: March 17, 2007, 10:53:54 pm »

I wanted to get some advice on RRS's panoramic equipment, specifically the Elements Pano Package (includes PCL-1 Precision panning base and MPR CL2 Nodal slider) that they sell for $360. The other product made by them that I was considering was the Ultimate Omni-Pivot package which is $440.

I'm looking for some advice on both the RRS product as well as alternatives. Is the elements package restrictive Long-term i think i'd be interested in the Ulimate Pro Omni Pivot, but at $800 that is a little pricey and a lot more then what i want to spend.. I woud like to stick with a product that uses an arca-swiss type mount/plates.

I don't have any experience in shooting digital panoramas right now, but am interested i getting into digitial stiching after being a little intimidated when i first got into digital last year. I do miss shooting panorama's since selling my xpan and so far during my first year in digital, i've pretty much limited myself to using canon's DPP.

I'd also like to know how difficult digital stiching is. I generally don't like spending a lot of time in the computer and have been very reluctant to learn Photoshop, as while I find DPP slow to work with, it meets my needs (raw conversion, sharpening, adjust wb/saturation/contrast, eliminate dust).

I'd also appreicate some advice on software (the easier and simpler to use the better).
Logged
----
[url=http://www.pbase.com/kssphotog

alainbriot

  • Sr. Member
  • ****
  • Offline Offline
  • Posts: 796
  • http://www.beautiful-landscape.com
    • http://www.beautiful-landscape.com
RRS Panoramic equipment
« Reply #1 on: March 18, 2007, 01:04:43 am »

Basically there are two types of stitching: single row and multiple rows.  Single row can be done with the basic RRS packages.  I don't have the names in mind but you basically need the base and the nodal point slider.  Single row is when you pan the camera from left to right, shooting several frames, usually verticals to maximize pixel count and image height.

Multiple row requires the Ulimate Pro Omni Pivot package. Multiple rows means you are shooting frames from left to right, as described above, but then you tilt the camera up or down to shoot a second and usually a third row, continuing to shoot from left to right (or right to left, same thing) after you tilt the camera.  For this you need two nodal sliders, hence the more complex and expensive setup. The cost doubles basically because you need twice as many parts as for single row.  The final images consist usually of 15 or 18 images, 3x5 or 3x6 for a three row stitch.  A longer lens is used and visualization of the complete image is best done with a wide angle prior to starting to shoot. The resulting stitch that I just described exceeds the resolution of scanned 4x5 film.

Note that you need a ballhead for ease of leveling either setup.  it is not totally indispensable, but without a ballhead you have to adjust the height of the tripod legs which is way more difficult than just adjusting the ballhead. You also need a level on the ballhead.  RRS ballheads have one and they are among the very best at this time.

Stitching is done in the pano-stitching software of your choice.  PT GUI is one of the best
« Last Edit: March 18, 2007, 01:49:09 pm by alainbriot »
Logged
Alain Briot
Author of Mastering Landscape Photography
http://www.beautiful-landscape.com

Thomas Krüger

  • Sr. Member
  • ****
  • Offline Offline
  • Posts: 447
    • http://thomaskrueger.eu
RRS Panoramic equipment
« Reply #2 on: March 18, 2007, 02:41:28 am »

The Manfrotto/Bogen 555B Leveling Center Column for 055 Pro and 3021 Pro Tripods is very good to level the camera.

[attachment=2110:attachment]
Logged

Khurram

  • Sr. Member
  • ****
  • Offline Offline
  • Posts: 488
RRS Panoramic equipment
« Reply #3 on: March 18, 2007, 01:36:00 pm »

Quote
Basically there are two types of stitching: single row and multiple rows.  Single row can be done with the basic RRS packages.  I don't have the names in mind but you basically need the base and the nodal point slider.  Single row is when you pan the camera from left to right, shooting several frames, usually verticals to maximize pixel count and image height.

Multiple row requires the Ulimate Pro Omni Pivot package. Multiple rows means you are shooting frames from left to right, as described above, but then you tilt the camera up or down to shoot a second and usually a third row, continuing to shoot from left to right (or right to left, same thing) after you tilt the camera.  For this you need two nodal sliders, hence the more complex and expensive setup. The cost doubles basically because you need twice as many parts as for single row.  The final images consist usually of 15 or 18 images, 3x5 or 3x6 for a three row stitch.  A longer lens is used and visualization of the complete image is best done with a wide angle prior to starting to shoot. The resulting stitch that I just described exceeds the resolution of scanned 4x5 film.

Note that you need a ballhead for ease of leveling either setup.  it is not totally indispensable, but without a ballhead you have to adjust the height of the tripod legs which is way more difficult than just adjusting the ballhead. You also need a level on the ballhead.  RRS ballheads have one and they are among the very best at this time.

Stitching is done in the pano-stitching software of your choice.  PT GUI is among the best
[a href=\"index.php?act=findpost&pid=107244\"][{POST_SNAPBACK}][/a]

Thanks for the advice Alain!  Does the PCL-1 Precision Panning base attach to the ballhead (I have the BH-55)?
Logged
----
[url=http://www.pbase.com/kssphotog

alainbriot

  • Sr. Member
  • ****
  • Offline Offline
  • Posts: 796
  • http://www.beautiful-landscape.com
    • http://www.beautiful-landscape.com
RRS Panoramic equipment
« Reply #4 on: March 18, 2007, 01:45:40 pm »

Quote
Thanks for the advice Alain!  Does the PCL-1 Precision Panning base attach to the ballhead (I have the BH-55)?
[a href=\"index.php?act=findpost&pid=107302\"][{POST_SNAPBACK}][/a]

Yes.  Al RRS components are compatible with each other.  The panning base replaces the plate attachment part of your ballhead (where you attach your camera with the camera plate).  You unscrew the base you currently have and replace it with the panning base.

If you only do panoramas at infinity, with no close objects, you may be able to do away with the nodal slide since there wouldn't be parallax issues (no objects located in front of one another but instead all objects at infinity).
« Last Edit: March 18, 2007, 01:47:33 pm by alainbriot »
Logged
Alain Briot
Author of Mastering Landscape Photography
http://www.beautiful-landscape.com

ChrisGolden

  • Newbie
  • *
  • Offline Offline
  • Posts: 4
RRS Panoramic equipment
« Reply #5 on: March 18, 2007, 02:41:27 pm »

Quote
Yes.  Al RRS components are compatible with each other.  The panning base replaces the plate attachment part of your ballhead (where you attach your camera with the camera plate).  You unscrew the base you currently have and replace it with the panning base.
You can go this route, or, if you'd rather keep your BH-55's existing clamp, you can get RRS's PCL-DVTL piece and attach it to the bottom of your PCL-1.  This gives the PCL-1 a dovetail that allows you to clamp it to your BH-55.  The PCL-DVTL is relatively cheap (for RRS, anyway), lightweight, low-profile, and in my experience works quite well.

Hope this helps!
Logged

Khurram

  • Sr. Member
  • ****
  • Offline Offline
  • Posts: 488
RRS Panoramic equipment
« Reply #6 on: March 18, 2007, 08:04:19 pm »

Chris/Alain,
Thanks for your advice!!
Logged
----
[url=http://www.pbase.com/kssphotog

azmike

  • Jr. Member
  • **
  • Offline Offline
  • Posts: 53
    • http://
RRS Panoramic equipment
« Reply #7 on: March 18, 2007, 08:28:53 pm »

I would second Alain's advice about RRS.  They make very high quality well designed "stuff" and are very helpful over the phone.

I also struggled with which pieces/packages to use (was there a less expensive combination), and in the end wound up with the equivalent of their Ultimate Pro Omni Pivot Pkg. Their catalog is a bit confusing in that it has all the possible pieces as well as packages.

This might help:  I do stitched landscape photography in the Arizona backcountry with a D-200 with the heaviest lens being 70-200/2.8. The D-200 has the RRS L-plate attached. I have a carbon fiber tripod with the BH-40 ball head with the PCL-1 permanently mounted. This makes both leveling quick and a good panning base. Then the RRS: MRP-192, CDR rail, PCL-1 (for vertical panning) and the MPR-CL 2 nodal slide.

I find setup to be quick and sure, movements smooth, and quite important, no drooping or slippage once positioned.

I use PTAssembler software from Max Lyons. For me it yields superb high resolution images.  It's only $40 and Max has a very active and well supported on-line forum.  I don't know other software, but I suspect that stitched photography could fairly be termed "craftsmanship intensive", i.e. the more time and skill invested, the better the result.

Mike Coffey
Logged

Chris_T

  • Sr. Member
  • ****
  • Offline Offline
  • Posts: 541
RRS Panoramic equipment
« Reply #8 on: March 25, 2007, 08:22:21 am »

Quote
Stitching is done in the pano-stitching software of your choice.  PT GUI is one of the best
[a href=\"index.php?act=findpost&pid=107244\"][{POST_SNAPBACK}][/a]

I tried stitching two images in a single row with PS, and found the result horrible. The two images were shot without a pano head, but were on a tripod, with the same exposure/focus and overlapping by 40%+. Not sure if the problem was due to hw or sw.

There are many online tutorials on home-brew pano heads, but I have yet to try any.

My understanding is that the best pano-stitching software is based on Pano Tools. PT GUI (costs a little more), PTAssembler and Hugin (freeware) are all frontends based on PT. I tried Hugin and didn't get too far with it. The documentation is insufficient for me to understand the UI.

I would appreciate comparisons between PT GUI and PTAssembler from those who have used both.
Logged

naisan

  • Newbie
  • *
  • Offline Offline
  • Posts: 25
RRS Panoramic equipment
« Reply #9 on: April 14, 2007, 11:44:18 pm »

Get the software first, try it out, and then buy the gear.

I've done a ton of stitching, mainly to feed 30,000 pixel wide images to my iPF5000 at 600 dpi to get a 17" X 50" print with incredible detail, with very little enlargement. So I end up taking a panorama of 3 rows say of 16 shots for each row, of one oak tree, with a 85mm lens, rather than shooting that same oak with one frame at 17mm from roughly the same distance. This is the image, scaled massively down:

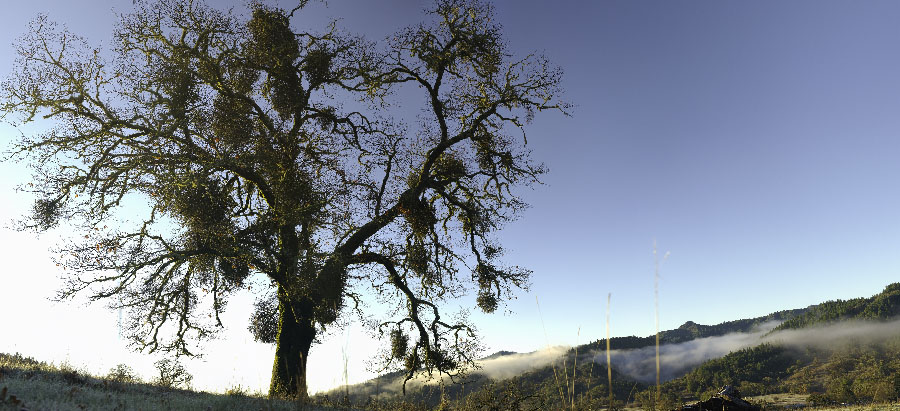
Notice the two yellow grass reeds at the bottom right standing up about 1/3-way into the shot. These were on about 8 of the frames shot (multi-row, and you ahve to overlap shots) so this shows you how good the software is at multi-row panoramas.

My equipment for this shot?  
1) a tripod
2) a RRS BH-40 Ballhead
3) D200 with 85 1.4 lens and polarizing filter.

Now - I am going to say something heretical here: You may not need specialized gear. The software is just that good. You can shoot a multi-row panorama hand-held, if you're reasonably careful, with great results esp if you're shooting far-away objects (i.e. not much you're shooting is physically near you in the foreground.

My advice in sequential order:
1. Before you buy any equipment at all, download PT-Gui, and also download and install (i.e. expand into the right directory and set up in the options) the SmartBlendplug-in. Then go out, and hand-held, shoot a 3-image pano (by taking three shots with say 25% overlap) and use the stitching software to stitch it all together.
2. Then shoot using your tripod and the panning base on your ballhead, and stitch some 5 image sets.
3. use your ballhead to do a 2-row 5 shot set, and stitch that.

By the time you do this, you will start to see several things:
1. In most cases, you don't need specialized equipment anymore unless you're shooting something pretty close to you. The special equipment allows the camera to rotate along the nodal point of the lens, so you don't get parallax issues, but good software like the smartblend plug-in all but obviates the need for that.

And then, if you find that you're serious, spend the $$ with RRS.

I bought a nodal ninja with my d200 setup, and get serious creep and saggage with that setup (D200, RRS l-bracket with mb-200 grip loaded with 2 batteries, + say a 85 1.4 lens. But that just means that it takes me longer to shoot, as you have to wait for the camera to settle down to eliminate shake for every frame of say a 35 frame shoot, and a remote and mirror-lock-up are a must.

Additionally, many people are reporting that some lenses like the nikon 70-200 2.8 has a nodal point very close to where the lens collar sits anyways.

Get the software, try it out, and then buy the gear.
Logged

BernardLanguillier

  • Sr. Member
  • ****
  • Offline Offline
  • Posts: 13983
    • http://www.flickr.com/photos/bernardlanguillier/sets/
RRS Panoramic equipment
« Reply #10 on: April 15, 2007, 12:59:40 am »

Quote
Additionally, many people are reporting that some lenses like the nikon 70-200 2.8 has a nodal point very close to where the lens collar sits anyways.
[a href=\"index.php?act=findpost&pid=112443\"][{POST_SNAPBACK}][/a]

The nodal point varies a lot according to the focal lenght with that lens.

At around 120 mm, it is reasonnably close to the collar location.

Regards,
Bernard

Phuong

  • Full Member
  • ***
  • Offline Offline
  • Posts: 113
RRS Panoramic equipment
« Reply #11 on: April 15, 2007, 03:54:32 am »

off topic a bit.
i just got interested in this panorama stuffs and started researching about it. and just learnt that what we're calling the "nodal point" is a misconception - although it's not that serious.
it's actually called the "entrance pupil".

i found it here. http://en.wikipedia.org/wiki/Focal_plane
although i'm not sure how accurate the info is.
Quote
The nodal points are widely misunderstood in photography, where it is commonly asserted that the light rays "intersect" at "the nodal point", that the iris diaphragm of the lens is located there, and that this is the correct pivot point for panoramic photography, so as to avoid parallax error. These claims are all false, and generally arise from confusion about the optics of camera lenses, as well as confusion between the nodal points and the other cardinal points of the system. The correct pivot point for panoramic photography can be shown to be the centre of the system's entrance pupil
Logged

BernardLanguillier

  • Sr. Member
  • ****
  • Offline Offline
  • Posts: 13983
    • http://www.flickr.com/photos/bernardlanguillier/sets/
RRS Panoramic equipment
« Reply #12 on: April 15, 2007, 05:24:27 am »

Quote
what we're calling the "nodal point" is a misconception - although it's not that serious. it's actually called the "entrance pupil".

although i'm not sure how accurate the info is.
[a href=\"index.php?act=findpost&pid=112465\"][{POST_SNAPBACK}][/a]

That's indeed correct, but the difference is kind of academic...

Cheers,
Bernard

Chris_T

  • Sr. Member
  • ****
  • Offline Offline
  • Posts: 541
RRS Panoramic equipment
« Reply #13 on: April 15, 2007, 08:12:54 am »

Quote
Basically there are two types of stitching: single row and multiple rows.  Single row can be done with the basic RRS packages.  I don't have the names in mind but you basically need the base and the nodal point slider.  Single row is when you pan the camera from left to right, shooting several frames, usually verticals to maximize pixel count and image height.
[a href=\"index.php?act=findpost&pid=107244\"][{POST_SNAPBACK}][/a]

Horizontal panos are common, but I find vertical panos can be dramatic. Does the RRS basic setup also work for a single column stitch?
Logged

Chris_T

  • Sr. Member
  • ****
  • Offline Offline
  • Posts: 541
RRS Panoramic equipment
« Reply #14 on: April 15, 2007, 08:25:37 am »

Quote
Now - I am going to say something heretical here: You may not need specialized gear. The software is just that good. You can shoot a multi-row panorama hand-held, if you're reasonably careful, with great results esp if you're shooting far-away objects (i.e. not much you're shooting is physically near you in the foreground.

[a href=\"index.php?act=findpost&pid=112443\"][{POST_SNAPBACK}][/a]

Thanks for your "heretical" comments with great context to support them, we need more of this kind.

Many like their wide angle (or pano) landscape images to include some prominent foreground objects to emphasize scale and distance.  My understanding is that pano heads can help stitching this kind of shots. Do you happen to have more such examples to demo no pano heads are needed?

As an aside, there are quite a few tutorials on how to build you own pano heads.
Logged

amplexis

  • Newbie
  • *
  • Offline Offline
  • Posts: 22
RRS Panoramic equipment
« Reply #15 on: April 15, 2007, 01:30:35 pm »

where are the tutorials on building pano heads? any help would be greatly appreciated.
i am especially interested in building a head with no right angles as this is a great nurturer of vibration. my current approach is a tublar swept arm like on the wimberlys but having it U shaped so there is support on both sides and mounting for the lens on a quick release plate on the bottom of the swinging part. i also am trying to intergrate 120/1 worm gears that i bought on ebay and stops every 5 degrees like on the manfrotto 300N.
is anyone else exploring these things?
thanks,
vincent
Logged

marcmccalmont

  • Sr. Member
  • ****
  • Offline Offline
  • Posts: 1780
RRS Panoramic equipment
« Reply #16 on: April 15, 2007, 01:44:03 pm »

I've had great results without all the fancy nodal equipment
I use a leveling tripod and a panning base
since most of my subjects are more than 100' away the software does a great job
I've stitched handhelds with good results
I prefer PTGui
I think the advice, buy the software first is good
Marc

This one was handheld, in the program mode and I was a bit hypoxic! Everything done wrong!
[attachment=2295:attachment]
Logged
Marc McCalmont

amplexis

  • Newbie
  • *
  • Offline Offline
  • Posts: 22
RRS Panoramic equipment
« Reply #17 on: April 15, 2007, 03:12:33 pm »

RRS is very straightforward about the fact that their pano parts are not meant for longer or heavier telephoto lenses. is anyone using a 1 series body and a 300mm lens? is the RRS plc-1 clamp suitable for heavier bodies and lenses? RRS is telling me they are not.
does anyone know of a good website that is helpful in reducing vibration in the design of a head? yesterday a wildlife shooter who i highly regard pointed out the evils of right angles in the design of camera support. i think this is sound mechanical engineering.
i've been building pano heads using bent 1/4"X1 1/2' aluminum and the vibratiobn is substantial. i really think it's worth my time to make a pattern and have it cast in the interest of having something i will enjoy using.
thanks,
vincent
Logged

AJSJones

  • Sr. Member
  • ****
  • Offline Offline
  • Posts: 357
RRS Panoramic equipment
« Reply #18 on: April 15, 2007, 03:43:34 pm »

Vincent,
With a 300 mm lens, I seriously doubt you need any additional equipment beyond some means of panning


This was 5 verticals with a 300 simply panned (I've no idea whewre the "nodal" point is for this lens).  No pano software used, and very little geometry adjustment in PS (possibly none, I can't recall absolutely)

Andy
Logged

amplexis

  • Newbie
  • *
  • Offline Offline
  • Posts: 22
RRS Panoramic equipment
« Reply #19 on: April 15, 2007, 04:30:26 pm »

Quote
The heaviest I use is a D2x + 20-200.  I'm more of a wide-angle shooter, so can't help you there
That's a big subject - Take a look here:
Beam Bending Examples
Design Handbook Index also has tons of information.

Have fun!
[a href=\"index.php?act=findpost&pid=112549\"][{POST_SNAPBACK}][/a]
thanks this is very useful. i see that i should forget about aluminum and start thinking about steel.
i have done a good number of panos in the past year where i'm stitching 100-200 shots using my 70-200mm lens and a one armed L bracket on a manfrotto 300N rotator. the 300N has 4,6,8,12,15,18,24,36 and 72 stop increments. it's when you get below 5 degree increments that things get complicated.
a 300mm lens is   6.9X4.6 degrees
a 400   is 5.2X 3.4 degrees
and a 500   is 4.1X2.7 degrees
so building in some mechanical means of incramenting the rotation on the shots is one of the things i'm trying to figure out. especially with waterfall shots where good regular overlap is important.
i already have commissions for these 20 foot plus murals so i do need to work this out.
thanks again,
vincent
Logged
Pages: [1] 2   Go Up