Pages: 1 2 [3]   Go Down

Author Topic: Frustrated about HDR and dynamic range?  (Read 16970 times)

Hans Kruse

  • Sr. Member
  • ****
  • Offline Offline
  • Posts: 2106
    • Hans Kruse Photography
Re: Frustrated about HDR and dynamic range?
« Reply #40 on: January 21, 2015, 06:44:38 am »

I guess I should have been more precise.  The implementation techniques are of course different, in that one uses built-in LightRoom controls to equalize exposures, while the other uses custom software, and one uses Photoshop layers to combine frames, while the other uses custom software.  However, the basic idea and the end results are the same -- create an image where the darker (noisier) pixels come from an over-exposed (less noisy) frame, mathematically scaled back down to the proper brightness.

I'm curious, have you tried my approach? Have you tried the other approaches? I can tell you the result is not the same, well maybe from 30.000 feet  ;D

EricV

  • Sr. Member
  • ****
  • Offline Offline
  • Posts: 270
Re: Frustrated about HDR and dynamic range?
« Reply #41 on: January 21, 2015, 12:28:34 pm »

Yes, I have tried your approach.  It works great.  It was a very fine idea to combine the exposures in the way you do, using existing programs to make the work quick and easy.  I still consider the end result equivalent to creating a file with extended dynamic range (lower noise shadows), ready for further processing by the user.  I dislike the HDR tone mapping imposed by some other approaches.  Your method makes this a separate and optional step, which is perfect.  I prefer to use only normal LightRoom adjustments, as you suggest in your workflow.
Logged

Hans Kruse

  • Sr. Member
  • ****
  • Offline Offline
  • Posts: 2106
    • Hans Kruse Photography
Re: Frustrated about HDR and dynamic range?
« Reply #42 on: January 21, 2015, 04:04:13 pm »

Yes, I have tried your approach.  It works great.  It was a very fine idea to combine the exposures in the way you do, using existing programs to make the work quick and easy.  I still consider the end result equivalent to creating a file with extended dynamic range (lower noise shadows), ready for further processing by the user.  I dislike the HDR tone mapping imposed by some other approaches.  Your method makes this a separate and optional step, which is perfect.  I prefer to use only normal LightRoom adjustments, as you suggest in your workflow.

Thanks Erik for trying it. In principle I agree with what you say about blending before editing of multiple exposures, but the approaches are currently limited to 32 bit TIF files done in the Photomatic 32 bit plugin for Lightroom and Photoshop HDR Pro (32 bit) as well as LR/Enfuse. I'm not aware of any other commercially available methods. I have tried them all and sometimes they work and sometimes not. Therefore the presented approach is an approach that can be used in such cases of even in most cases.

Guillermo Luijk

  • Sr. Member
  • ****
  • Offline Offline
  • Posts: 2005
    • http://www.guillermoluijk.com
Re: Frustrated about HDR and dynamic range?
« Reply #43 on: January 21, 2015, 05:08:16 pm »

Hans, I cannot try the method since I don't have LR. I guess it works fine in the task of achieving the desired tone mapping action so as the expected noise reduction. But I find two weak points.

The problem I see is that manually brushing layers means progressive blending, and this means a loss of sharpness. Even if the captures are software aligned, missalignment is a continuous variable, it never happens at 1-photosite intervals, so you can have up to 1/2 pixel missalignment even after aligning the captures.

I have managed though to achieve perfect alignment both with my 350D DSLR (mirror lockup, remote shutter) and my E-P5 (no mirror, remote shutter), but I prefer a non-progressive blending of images so I don't need to worry about that.

Commercial software such as Photomatix also apply strong progressive blending, and this ruins sharpness specially if you take care in this aspect (good optics, perfect focus,...). This is an example where I showed a Photomatix multiexposure maniac (he takes up to 9 shots at 1 stop intervals) how multiple shots can reduce sharpness in Photomatix because of its high progressiveness (7 captures means more progressive blending than 3 captures and hence loss of sharpness):


Of course this is pixel peeping, but if you spend a good amount of money in a sharp lens you don't want this to happen. You don't want progressive blending.


Thanks to sensor linearity, captures of different exposure can be joined in a seamless composite reducing progessiveness to a minimum. This is just a recent scene, not very high DR but built from 3 captures 2 stops apart to make it very clean in terms of noise:


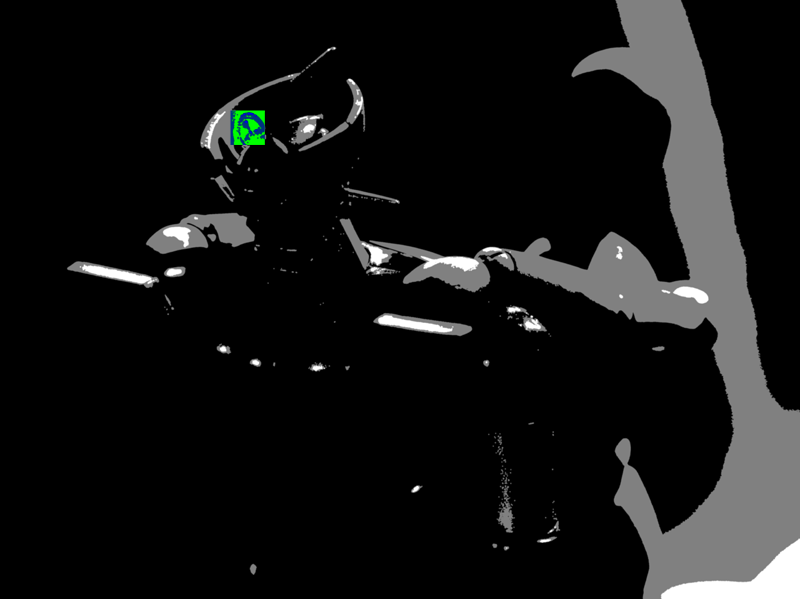
The following blending map illustrates which areas are taken from each of the 3 shots (obviously black represents the most exposed, and white the least):


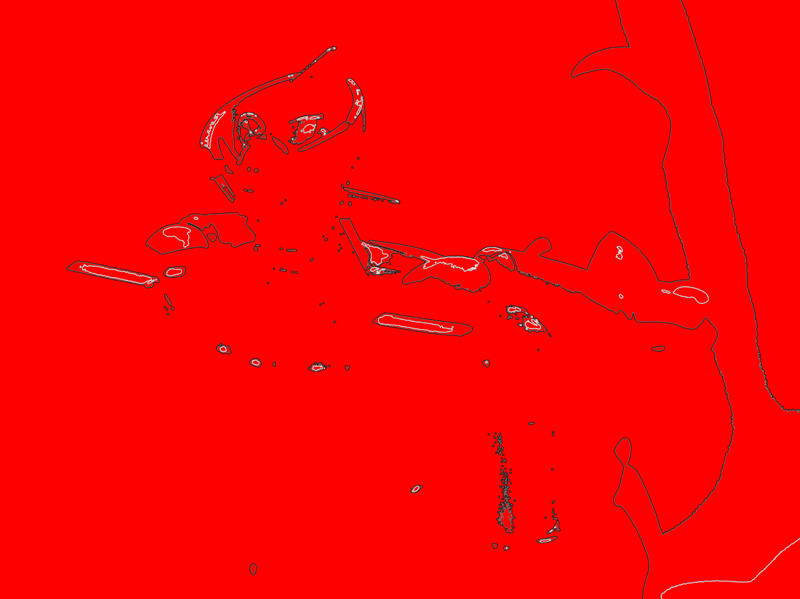
The same blending map here shows in red color those pixels that are strictly taken from just one shot. These usually represent between 95-97% of the total surface, this is a virtually 0-progressiveness approach and that means detail loss because of (micro)missalignment is almost reduced to none.


The green marked area above zoomed at 400% shows the 3 pixels progressive radius I chose for the blending.


The second criticism I could see is about suboptimum noise reduction. Even if noise is not a problem in the final image (and this goal is easily achieved when enough captures are taken), mixing images of different SNR makes the result be worse than just taking the most exposed (this holds true when differences of exposure are >1 stop). So again by manually brushing, you are not achieving the maximum SNR your source files could provide because the participation of lower exposure shots turns SNR down.

Regards
« Last Edit: January 21, 2015, 05:40:53 pm by Guillermo Luijk »
Logged

emcguirk

  • Newbie
  • *
  • Offline Offline
  • Posts: 2
    • Ed McGuirk Photography
Re: Frustrated about HDR and dynamic range?
« Reply #44 on: January 21, 2015, 06:17:38 pm »

Hans, I checked out your PDF, it was well prepared and very easy to follow.
 
I tried your method on several of my own image brackets, and compared it to results from the Photomatix Merge to 32 HDR Plugin. In every case I have tried so far, I prefer the look from your method. I find the Merge to 32 HDR plugin often creates some odd color and saturation shifts, and can easily look too HDR instead of realistic in certain parts of an image.
 
I have generally abandoned the Merge to 32 HDR plugin, and have been manually blending exposures in Photoshop, often using Tony Kuypers luminosity masks to assist the blend. This produces great results, but it is a very time consuming approach. Your method is very efficient, it produces very similar results in a fraction of the time of doing manual blends. And it produces more realistic looking results than the Merge to 32 HDR plugin.
 
Thank you very much for sharing this approach. The value of your method is it’s simplicity, it will be a great time saver.
Logged

Hans Kruse

  • Sr. Member
  • ****
  • Offline Offline
  • Posts: 2106
    • Hans Kruse Photography
Re: Frustrated about HDR and dynamic range?
« Reply #45 on: January 21, 2015, 06:57:45 pm »

Hans, I cannot try the method since I don't have LR. I guess it works fine in the task of achieving the desired tone mapping action so as the expected noise reduction. But I find two weak points.

The problem I see is that manually brushing layers means progressive blending, and this means a loss of sharpness. Even if the captures are software aligned, missalignment is a continuous variable, it never happens at 1-photosite intervals, so you can have up to 1/2 pixel missalignment even after aligning the captures.

I have managed though to achieve perfect alignment both with my 350D DSLR (mirror lockup, remote shutter) and my E-P5 (no mirror, remote shutter), but I prefer a non-progressive blending of images so I don't need to worry about that.

Commercial software such as Photomatix also apply strong progressive blending, and this ruins sharpness specially if you take care in this aspect (good optics, perfect focus,...). This is an example where I showed a Photomatix multiexposure maniac (he takes up to 9 shots at 1 stop intervals) how multiple shots can reduce sharpness in Photomatix because of its high progressiveness (7 captures means more progressive blending than 3 captures and hence loss of sharpness):

Of course this is pixel peeping, but if you spend a good amount of money in a sharp lens you don't want this to happen. You don't want progressive blending.

Thanks to sensor linearity, captures of different exposure can be joined in a seamless composite reducing progessiveness to a minimum. This is just a recent scene, not very high DR but built from 3 captures 2 stops apart to make it very clean in terms of noise:

The second criticism I could see is about suboptimum noise reduction. Even if noise is not a problem in the final image (and this goal is easily achieved when enough captures are taken), mixing images of different SNR makes the result be worse than just taking the most exposed (this holds true when differences of exposure are >1 stop). So again by manually brushing, you are not achieving the maximum SNR your source files could provide because the participation of lower exposure shots turns SNR down.

Guillermo,

I think it would be an idea if you e-mail me to get the description to avoid misunderstandings about the method I described. It is not about progressive blending at all at any point in the final image the pixels comes from one of the two images, not a blend.

Thanks for your post and I agree with what you write.

Hans Kruse

  • Sr. Member
  • ****
  • Offline Offline
  • Posts: 2106
    • Hans Kruse Photography
Re: Frustrated about HDR and dynamic range?
« Reply #46 on: January 21, 2015, 06:59:09 pm »

Hans, I checked out your PDF, it was well prepared and very easy to follow.
 
I tried your method on several of my own image brackets, and compared it to results from the Photomatix Merge to 32 HDR Plugin. In every case I have tried so far, I prefer the look from your method. I find the Merge to 32 HDR plugin often creates some odd color and saturation shifts, and can easily look too HDR instead of realistic in certain parts of an image.
 
I have generally abandoned the Merge to 32 HDR plugin, and have been manually blending exposures in Photoshop, often using Tony Kuypers luminosity masks to assist the blend. This produces great results, but it is a very time consuming approach. Your method is very efficient, it produces very similar results in a fraction of the time of doing manual blends. And it produces more realistic looking results than the Merge to 32 HDR plugin.
 
Thank you very much for sharing this approach. The value of your method is it’s simplicity, it will be a great time saver.


Thanks very much for your feedback. I agree very much on your view of the Photomatix 32 bit plugin for Lightroom, unfortunately.

Jglaser757

  • Full Member
  • ***
  • Offline Offline
  • Posts: 203
Re: Frustrated about HDR and dynamic range?
« Reply #47 on: January 22, 2015, 03:39:15 am »

Interesting thread. I used to use photomatix, HDR in photoshop and nik HDR programs, but now I just blend in PS. I will usually take 2-3 images and globally adjust each one in LR. I then bring them into PS as a layers. I then just use a gradient mask on top layer and get decent results. Afterwards, I will brush any other regions that need emphasis depending upon shadow detail. It's pretty quick and simple for me this way.  After this, I flatten and bring back into LR as working file. Then I will bring back into PS and ad a couple of curves, will sharpen specific areas, mid tone contouring and finally noise reduction.
Logged

Bart_van_der_Wolf

  • Sr. Member
  • ****
  • Offline Offline
  • Posts: 8914
Re: Frustrated about HDR and dynamic range?
« Reply #48 on: January 22, 2015, 07:14:29 am »

The problem I see is that manually brushing layers means progressive blending, and this means a loss of sharpness. Even if the captures are software aligned, missalignment is a continuous variable, it never happens at 1-photosite intervals, so you can have up to 1/2 pixel missalignment even after aligning the captures.

Hi Guillermo,

I agree that for all multiple exposure methods, alignment of the brackets is important for achieving the best results. But the method that Hans suggests, allows to define the sharpness/abruptness of the blending zone between two image layers by using a layer blending mask, thus minimizing the residual multiple exposure mis-alignment.

To improve alignment/registration of the output images, one could use a simple super-sampling trick, just output from LR at a larger size (e.g. 200%) and align those layers in Photoshop (which would reduce the average 1/2 photosite error to an average of 1/4th of an original photosite in the end). Then a down-sample to 50% would give us the original file dimensions in pixels but with better interpolated registration.
The only downside to that method is Photoshop's relatively poor resampling algorithms, but with down-sampling to 50% (after Lightroom's decent upsampling quality to 200%) there is not that much that is lost. Of course Capture sharpening of the twice resampled result will work quite nicely. Even the use of the built-in Smart sharpening will achieve an improvement (although a dedicated sharpening tool like FocusMagic will do better).

As long as one blends by using a mask, to reveal the highlight detail that was still Clipped in the overexposed shadow exposure bracket after pulling it's output luminosity with the Match exposure step in Lightroom, there will be plenty of opportunity to adjust that mask by using curves adjustments to create a faster transition near sharp edges, and use local blur for a more gradual transition. One could attempt using a 'sharp' mask (contrast enhanced by using a Curves adjustment on the mask), followed by a median blur (Filter>Noise>Median...) which tends to preserve sharper edges and blur gradual transitions more.

IMHO, the main feature of Hans' method is the Match Exposure step, which should allow to avoid brightness and color jumps at the blending seams to a significant degree.

Quote
The second criticism I could see is about suboptimum noise reduction. Even if noise is not a problem in the final image (and this goal is easily achieved when enough captures are taken), mixing images of different SNR makes the result be worse than just taking the most exposed (this holds true when differences of exposure are >1 stop). So again by manually brushing, you are not achieving the maximum SNR your source files could provide because the participation of lower exposure shots turns SNR down.

Using Smoothed blending mask edges will also hide (shot-)noise discontinuities/jumps in smooth gradient areas, where as Sharper edge transitions will avoid registration differences to spoil the party, by limiting the mix of different exposure contributions. Working with layer masks is more precise than using a Blend-if layer blending strategy, although that would also work well for many types of images where quick results are required.

Cheers,
Bart
« Last Edit: January 22, 2015, 07:23:40 am by BartvanderWolf »
Logged
== If you do what you did, you'll get what you got. ==

Hans Kruse

  • Sr. Member
  • ****
  • Offline Offline
  • Posts: 2106
    • Hans Kruse Photography
Re: Frustrated about HDR and dynamic range?
« Reply #49 on: January 22, 2015, 09:30:01 am »

IMHO, the main feature of Hans' method is the Match Exposure step, which should allow to avoid brightness and color jumps at the blending seams to a significant degree.

Thanks Bart, that step was the break through for me. One can also do this "manually" by adjusting the exposure between bracketed shots so they look equal and especially in the areas around the clipped highlights that need to be brushed. Although one could brush with an opacity to smooth areas that might fit 100% when the brushing stops, I so far did not need that.

Since the approach does in not involve blending pixels from different exposures there is no issue about sharpening as the capture sharpening I do in Lightroom come through into the final image from either the most exposed or the least exposed image. Pixels come 100% from one of the two images I blend with with approach.

Bart_van_der_Wolf

  • Sr. Member
  • ****
  • Offline Offline
  • Posts: 8914
Re: Frustrated about HDR and dynamic range?
« Reply #50 on: January 22, 2015, 10:27:45 am »

From the original post:
The way it can be done is as follows: One exposure that has acceptable or no clipping of highlights is selected. Edit it to your liking ignoring noise and artifacts. How much noise and artifacts depends on the dynamic range and the sensor involved (and ISO). When the editing is done check if there is another exposure exposed higher. Now select all the higher exposed files from the bracket sequence and copy the edits by shift-cmd-S and select all parameters. The edited file need to be the most selected, of course. Now align exposure by shift-alt-cmd-M. Then check each exposure and find the one with the best shadows and without being more than 3 stops higher exposed. Now open the files as layer in Photoshop (any version will do). Align the layers and put the most exposed as the top layer. Add an adjustment layer and brush the areas where the highlights are blown. Then save the file and back in Lightroom you have the blended result.

To improve the readability, I added a part of the original post above.

Thanks Bart, that step was the break through for me. One can also do this "manually" by adjusting the exposure between bracketed shots so they look equal and especially in the areas around the clipped highlights that need to be brushed. Although one could brush with an opacity to smooth areas that might fit 100% when the brushing stops, I so far did not need that.

Hi Hans,

I think it's the second part of your original description of the procedure (the part that I marked bold and italic) that may confuse readers, especially if they haven't read the whole thread or tried it themselves. Is it an adjustment layer, or a mask, that you create? If the latter, one has a lot of flexibility, allowing anything between hard and soft transition zones. Guillermo advocates (relatively) hard zone transitions to avoid mixing slightly mis-aligned layers.

Quote
Since the approach does in not involve blending pixels from different exposures there is no issue about sharpening as the capture sharpening I do in Lightroom come through into the final image from either the most exposed or the least exposed image. Pixels come 100% from one of the two images I blend with with approach.

Yes, that would be the case with a mask made with a hard brush. A blend-if layer adjustment would mix pixels based on luminosity, which will be different for the R/G/B channels even with a hard blend-if transition, so  a mask would be superior (and allows to correct it easily if needed).

Cheers,
Bart
Logged
== If you do what you did, you'll get what you got. ==

Hans Kruse

  • Sr. Member
  • ****
  • Offline Offline
  • Posts: 2106
    • Hans Kruse Photography
Re: Frustrated about HDR and dynamic range?
« Reply #51 on: January 22, 2015, 11:28:29 am »

From the original post:
To improve the readability, I added a part of the original post above.

Hi Hans,

I think it's the second part of your original description of the procedure (the part that I marked bold and italic) that may confuse readers, especially if they haven't read the whole thread or tried it themselves. Is it an adjustment layer, or a mask, that you create? If the latter, one has a lot of flexibility, allowing anything between hard and soft transition zones. Guillermo advocates (relatively) hard zone transitions to avoid mixing slightly mis-aligned layers.

Yes, that would be the case with a mask made with a hard brush. A blend-if layer adjustment would mix pixels based on luminosity, which will be different for the R/G/B channels even with a hard blend-if transition, so  a mask would be superior (and allows to correct it easily if needed).

Cheers,
Bart

Bart,

Actually I'm using Photoshop too seldom ;) I should have said that it is a layer mask that I created and that I painted on the layer mask in the areas of the clipped highlights. With the most exposed photo as the top layer and creating a layer mask on that layer I paint with black to reveal the lesser exposed image in the areas where the most exposed has clipped highlights. I find that a lot of landscape shots lends themselves to easily be blended using this approach but there are also pictures where this would not be so easy, at least with my Photoshop skills  ;D

Bart_van_der_Wolf

  • Sr. Member
  • ****
  • Offline Offline
  • Posts: 8914
Re: Frustrated about HDR and dynamic range?
« Reply #52 on: January 22, 2015, 11:52:49 am »

Actually I'm using Photoshop too seldom ;) I should have said that it is a layer mask that I created and that I painted on the layer mask in the areas of the clipped highlights.

That's what I assumed you did, and masks make perfect sense. The use of a hard brush on the mask will indeed select one, or the other layer, without blending.

As you also mentioned, it works best if the exposure differential is 2 stops of less between brackets. Otherwise there may be a visible jump in noise structure of the highlights.

Cheers,
Bart
« Last Edit: January 22, 2015, 11:58:27 am by BartvanderWolf »
Logged
== If you do what you did, you'll get what you got. ==

Guillermo Luijk

  • Sr. Member
  • ****
  • Offline Offline
  • Posts: 2005
    • http://www.guillermoluijk.com
Re:
« Reply #53 on: January 22, 2015, 12:20:45 pm »

The problem is when the blown highlights are not easy to brush because of their complexity. An accurate mask can be created in a pair of clicks without manual brushing, using the image itself as a luminosity map as explained in this tutorial: "Yet another method to reduce noise with two exposures".

http://jtrujillo.net/qpix/

Hans Kruse

  • Sr. Member
  • ****
  • Offline Offline
  • Posts: 2106
    • Hans Kruse Photography
Re:
« Reply #54 on: January 22, 2015, 02:26:18 pm »

The problem is when the blown highlights are not easy to brush because of their complexity. An accurate mask can be created in a pair of clicks without manual brushing, using the image itself as a luminosity map as explained in this tutorial: "Yet another method to reduce noise with two exposures".

http://jtrujillo.net/qpix/

Thanks and I agree this is easy way to do it. I will add this approach to the description.
Pages: 1 2 [3]   Go Up