Pages: [1] 2 3 4   Go Down

Author Topic: The x-y Easel - stepping easel for art repro  (Read 33033 times)

teddillard

  • Sr. Member
  • ****
  • Offline Offline
  • Posts: 717
    • http://www.teddillard.com
The x-y Easel - stepping easel for art repro
« on: October 29, 2013, 07:17:42 am »

Long, very long story short - I've finally got a really solid prototype of an easel that allows stepping capture by moving the artwork precisely, rather than moving the camera.  I'd really be interested in hearing feedback on it.  As far as I've been able to find, there's nothing else out there like it. 


In short, it's a vertical easel on the lines of a classic, large, H-frame painters easel.  It's equipped with a stepping motor (so far, manually controlled, but easily automated) that allows precise vertical motion.  It's on a dolly, which allows horizontal motion, also able to be motorized and automated at some point. 

The short pitch is, by virtue of the camera remaining static, focused on a fixed frame, and the subject moving through that frame, that frame is the only area you need to light. 

Here's a link to the site I tossed together to help show what it's all about: http://www.xy-easel.com.  There's a video there explaining the basic idea there too - can't figure out how to embed it here.   ::)

Looking forward to hearing your comments.  If you'd like to PM me, feel free, or email me at ted (at) teddillard.com
« Last Edit: June 05, 2016, 06:24:19 am by teddillard »
Logged
Ted Dillard

Chris_Brown

  • Sr. Member
  • ****
  • Offline Offline
  • Posts: 976
  • Smile dammit!
    • Chris Brown Photography
Re: My x-y easel - stepping easel for art repro
« Reply #1 on: October 29, 2013, 08:30:48 am »

I love this idea. Obviously, perfect lighting is paramount, and eliminating optical aberrations, too. I'll have to look into it.

A downside: It won't work when the art cannot be removed from its installation (which happens on occasion).
Logged
~ CB

Bart_van_der_Wolf

  • Sr. Member
  • ****
  • Offline Offline
  • Posts: 8915
Re: My x-y easel - stepping easel for art repro
« Reply #2 on: October 29, 2013, 11:03:48 am »

Long, very long story short - I've finally got a really solid prototype of an easel that allows stepping capture by moving the artwork precisely, rather than moving the camera.  I'd really be interested in hearing feedback on it.  As far as I've been able to find, there's nothing else out there like it.

Hi Ted,

It's looking good. It makes sense to use an inverted T-frame holding the artwork, sliding up and down on an H-frame. I agree that confining the area to be lit to a smaller area than the full artwork gives most flexibility and potential quality for lighting. It also allows better shielding of stray light, and of potential lens glare.

The only thing left is perpendicular alignment of the camera, but with flat-stitching that becomes slightly less critical since lens distortion can be corrected at the same time as optimal squaring. This will allow faster setup, although still no licence for sloppy work.

Well done.

Cheers,
Bart
Logged
== If you do what you did, you'll get what you got. ==

teddillard

  • Sr. Member
  • ****
  • Offline Offline
  • Posts: 717
    • http://www.teddillard.com
Re: My x-y easel - stepping easel for art repro
« Reply #3 on: October 29, 2013, 01:35:19 pm »

Yes, I went through a few variations on holding the painting securely and finally settled on the same basic idea as what a traditional painters' easel uses.  There's some lesson there about trying to re-invent the wheel, I'm just not quite sure what it is...   ;D

On getting it square and parallel, that's not a problem.  I just use a Zig-Align, and as long as the camera is at the same angle as the art, which figures to about 10º, you're perfectly square and centered.  

As with any case of shooting flat art, a good lens really pays off.  I was using an old 55mm Micro-Nikkor, but found a good deal on the 105 Micro-Nikkor and that's even better.  Edge-to-edge sharpness a few stops down from wide-open is amazing.
« Last Edit: October 29, 2013, 01:38:02 pm by teddillard »
Logged
Ted Dillard

KirbyKrieger

  • Sr. Member
  • ****
  • Offline Offline
  • Posts: 422
    • Kirby Krieger Pictures
Re: My x-y easel - stepping easel for art repro
« Reply #4 on: November 03, 2013, 03:56:04 pm »

If you haven't, you might take at look at Hugh's Easels, or Gung (apparently no longer available in the US).  I painted for years on a Gung TJ7070B.  Superb easel:  x on rollers, y on a counter-balanced slide, tilt on a crank.  I put the whole easel on three extra large, soft-rubber locking wheels (z).  When I bought mine, the top-of-the-line supported something like 1,000 lbs. — made for working on sections of frescoed walls.

http://www.hugheseasels.com
http://www.artsmate.com/?product-98.html

teddillard

  • Sr. Member
  • ****
  • Offline Offline
  • Posts: 717
    • http://www.teddillard.com
Re: My x-y easel - stepping easel for art repro
« Reply #5 on: November 03, 2013, 06:24:12 pm »

There's also David Sorg's easel: http://studioeasel.com/  These are what got me looking at the traditional painter's method of holding the work securely.  Unfortunately, a lot of those easels are very heavy, and very expensive.

I was originally planning on adding a motor drive control to one of those and making it a permanent, non-portable version along with a smaller portable version.  As it turned out, the one I ended up with works great for large canvases, yet is still under 50lbs and is portable.   
Logged
Ted Dillard

KirbyKrieger

  • Sr. Member
  • ****
  • Offline Offline
  • Posts: 422
    • Kirby Krieger Pictures
Re: My x-y easel - stepping easel for art repro
« Reply #6 on: November 03, 2013, 07:01:17 pm »

Thanks for the David Sorg link — good to have.   :)

BobDavid

  • Sr. Member
  • ****
  • Offline Offline
  • Posts: 3311
Re: My x-y easel - stepping easel for art repro
« Reply #7 on: November 03, 2013, 09:05:17 pm »

I use the same technique except the camera is mounted on a nine foot column. A counterweight makes it easy to slide the camera up and down. Of course, I shoot tethered. I've got a grid marked on the floor that's about 8 X 6 feet. Of course the camera is calibrated and a flat field lens is employed. The ceiling is painted flat black and the floor is dark grey. The pitch and yaw of the camera mount is adjustable. The 2 X 2 foot capture area is illuminated evenly.
« Last Edit: November 03, 2013, 09:22:53 pm by BobDavid »
Logged

jeremydillon

  • Jr. Member
  • **
  • Offline Offline
  • Posts: 60
Re: My x-y easel - stepping easel for art repro
« Reply #8 on: November 03, 2013, 11:06:51 pm »

What do you use to stitch your images? I find that all the stitching packages fall apart when there are large areas without much significant detail. I almost always revert to doing it manually in photoshop if this happens. (the best I've found is microsoft ICE)
Logged

teddillard

  • Sr. Member
  • ****
  • Offline Offline
  • Posts: 717
    • http://www.teddillard.com
Re: My x-y easel - stepping easel for art repro
« Reply #9 on: November 04, 2013, 05:20:45 am »

Bob, the problem (and the key concept of the x-y easel) is that when you move the camera, you're moving the frame.  The easel allows the frame to stay in place, thus, your lighting "stays in place" as well.  You only light the frame you're shooting, rather than the entire work. 

I've been using Photoshop to stitch, and yes, arranging most of it manually. 
Logged
Ted Dillard

Bart_van_der_Wolf

  • Sr. Member
  • ****
  • Offline Offline
  • Posts: 8915
Re: My x-y easel - stepping easel for art repro
« Reply #10 on: November 04, 2013, 05:49:01 am »

What do you use to stitch your images? I find that all the stitching packages fall apart when there are large areas without much significant detail. I almost always revert to doing it manually in photoshop if this happens. (the best I've found is microsoft ICE)

Hi Jeremy,

Dedicated pano-stitchers offer a solution for these types of image capture.

For example, PTGUI offers an Align to Grid project setting, where the images that were shot in a particular order are placed in a grid formation. Subsequent alignment will optimize the tiles for which control points can be found, and will keep the featureless tiles in their shooting order position.

Cheers,
Bart
Logged
== If you do what you did, you'll get what you got. ==

teddillard

  • Sr. Member
  • ****
  • Offline Offline
  • Posts: 717
    • http://www.teddillard.com
Re: My x-y easel - stepping easel for art repro
« Reply #11 on: November 04, 2013, 03:50:22 pm »

I should add - my next project is to use an Arduino control to program the stepping and shooting.  If I can get it done (which really isn't that hard, Arduino-wise) then the entire system can be run literally at the push of a button - shoot, step, shoot, etc, all with one activation, and at whatever stepping intervals you want. 

This is the reason the motor drive is such a key to the whole thing, and another reason why the big studio easels weren't working for me. 
Logged
Ted Dillard

BobDavid

  • Sr. Member
  • ****
  • Offline Offline
  • Posts: 3311
Re: My x-y easel - stepping easel for art repro
« Reply #12 on: November 08, 2013, 09:32:19 pm »

Bob, the problem (and the key concept of the x-y easel) is that when you move the camera, you're moving the frame.  The easel allows the frame to stay in place, thus, your lighting "stays in place" as well.  You only light the frame you're shooting, rather than the entire work. 

I've been using Photoshop to stitch, and yes, arranging most of it manually. 

I move the art, not the camera. The column simply enables me to move the camera up or down depending on the size of the original art work--anything from 24mm X 36mm to 6 X 8 feet.
Logged

teddillard

  • Sr. Member
  • ****
  • Offline Offline
  • Posts: 717
    • http://www.teddillard.com
Re: My x-y easel - stepping easel for art repro
« Reply #13 on: November 09, 2013, 05:45:27 am »

Ah, got it, sorry.  How do you hold and move it? 
Logged
Ted Dillard

BobDavid

  • Sr. Member
  • ****
  • Offline Offline
  • Posts: 3311
Re: My x-y easel - stepping easel for art repro
« Reply #14 on: November 09, 2013, 12:58:15 pm »

Ah, got it, sorry.  How do you hold and move it?  

An array of aluminum jigs with tick marks along the x-axis is attached to the floor with either weights, velcro, or suctions cups depending on the size. I also have a sheet of masonite that is designed to be used as a pin registration stage.

Along the Y-axis, another set of aluminum jigs are held in place by inserting pins into socket holes (hollow .75" metal cylinders) that have been carefully installed into the concrete floor.

The system took a few days to design and about a 40 hours to build. Here is an example of an artwork reproduced using my setup. http://www.topdogimaging.net/about/fine-art-reproduction.html  I am now out of the art repro business and am concentrating on resuscitating antique and vintage photos.

My solution is by no means portable. It is accurate, simple, and precise.
« Last Edit: November 09, 2013, 01:12:05 pm by BobDavid »
Logged

teddillard

  • Sr. Member
  • ****
  • Offline Offline
  • Posts: 717
    • http://www.teddillard.com
Re: My x-y easel - stepping easel for art repro
« Reply #15 on: November 10, 2013, 09:35:18 am »

Ah, nice.  I have a few clients with huge murals, and one of my motivations was to make it so I could "come to the mountain" rather than ask my clients to bring the mountain to me...   ;D

...I also very much prefer shooting in their studios.  But that's another tale. 
Logged
Ted Dillard

teddillard

  • Sr. Member
  • ****
  • Offline Offline
  • Posts: 717
    • http://www.teddillard.com
Re: My x-y easel - stepping easel for art repro
« Reply #16 on: December 19, 2013, 06:49:50 am »

Well, push has come to shove, and I've put a Kickstarter project together as a "proof of the pudding".  I've opted for this for a few reasons.  

First, I firmly believe this is a really important development in the tools we have available for Fine Art repro - not only the easel, but the whole process.  I want to get the story out there, and I want to do it with a complete body of work.  As important, I need to do it with an artist who understands what we're trying to do, and is as critical as we are, and understanding of the technical aspects of the process, to really take this to the next level.  

Warren Prosperi has been with me every step of the way with this process, even to the point of helping me develop it.  Thus, The Prosperi Studio.  

I also want to use this opportunity to help Prosperi Studio by reproducing their complete catalog of work.  It's important work, and I feel it deserves support.

Read more about what we're doing here: http://www.kickstarter.com/projects/952491968/the-atelier-print-the-prosperi-project

I'd love some feedback and discussion about this.  It's always been a work in progress, and even more now.  This is a combination of the easel and stepping/stitching techniques, color management from front to back, and most importantly, lighting techniques.  Of course, if you'd like to support the KS project with a donation or by spreading the word, I wouldn't mind that either.  :D
« Last Edit: December 19, 2013, 06:55:03 am by teddillard »
Logged
Ted Dillard

teddillard

  • Sr. Member
  • ****
  • Offline Offline
  • Posts: 717
    • http://www.teddillard.com
Re: My x-y easel - stepping easel for art repro
« Reply #17 on: August 26, 2014, 06:03:46 am »

HA!  Just got this message: "Warning: this topic has not been posted in for at least 120 days.
Unless you're sure you want to reply, please consider starting a new topic."

No kiddin'.   :D  (I don't know if I'm just slow, or what, but I've been chipping away at this for over 5 years now.)  

Well, I've been shooting with this thing and working on the mechanism and shooting and cursing and checking Craigslist...  and this is the result.  
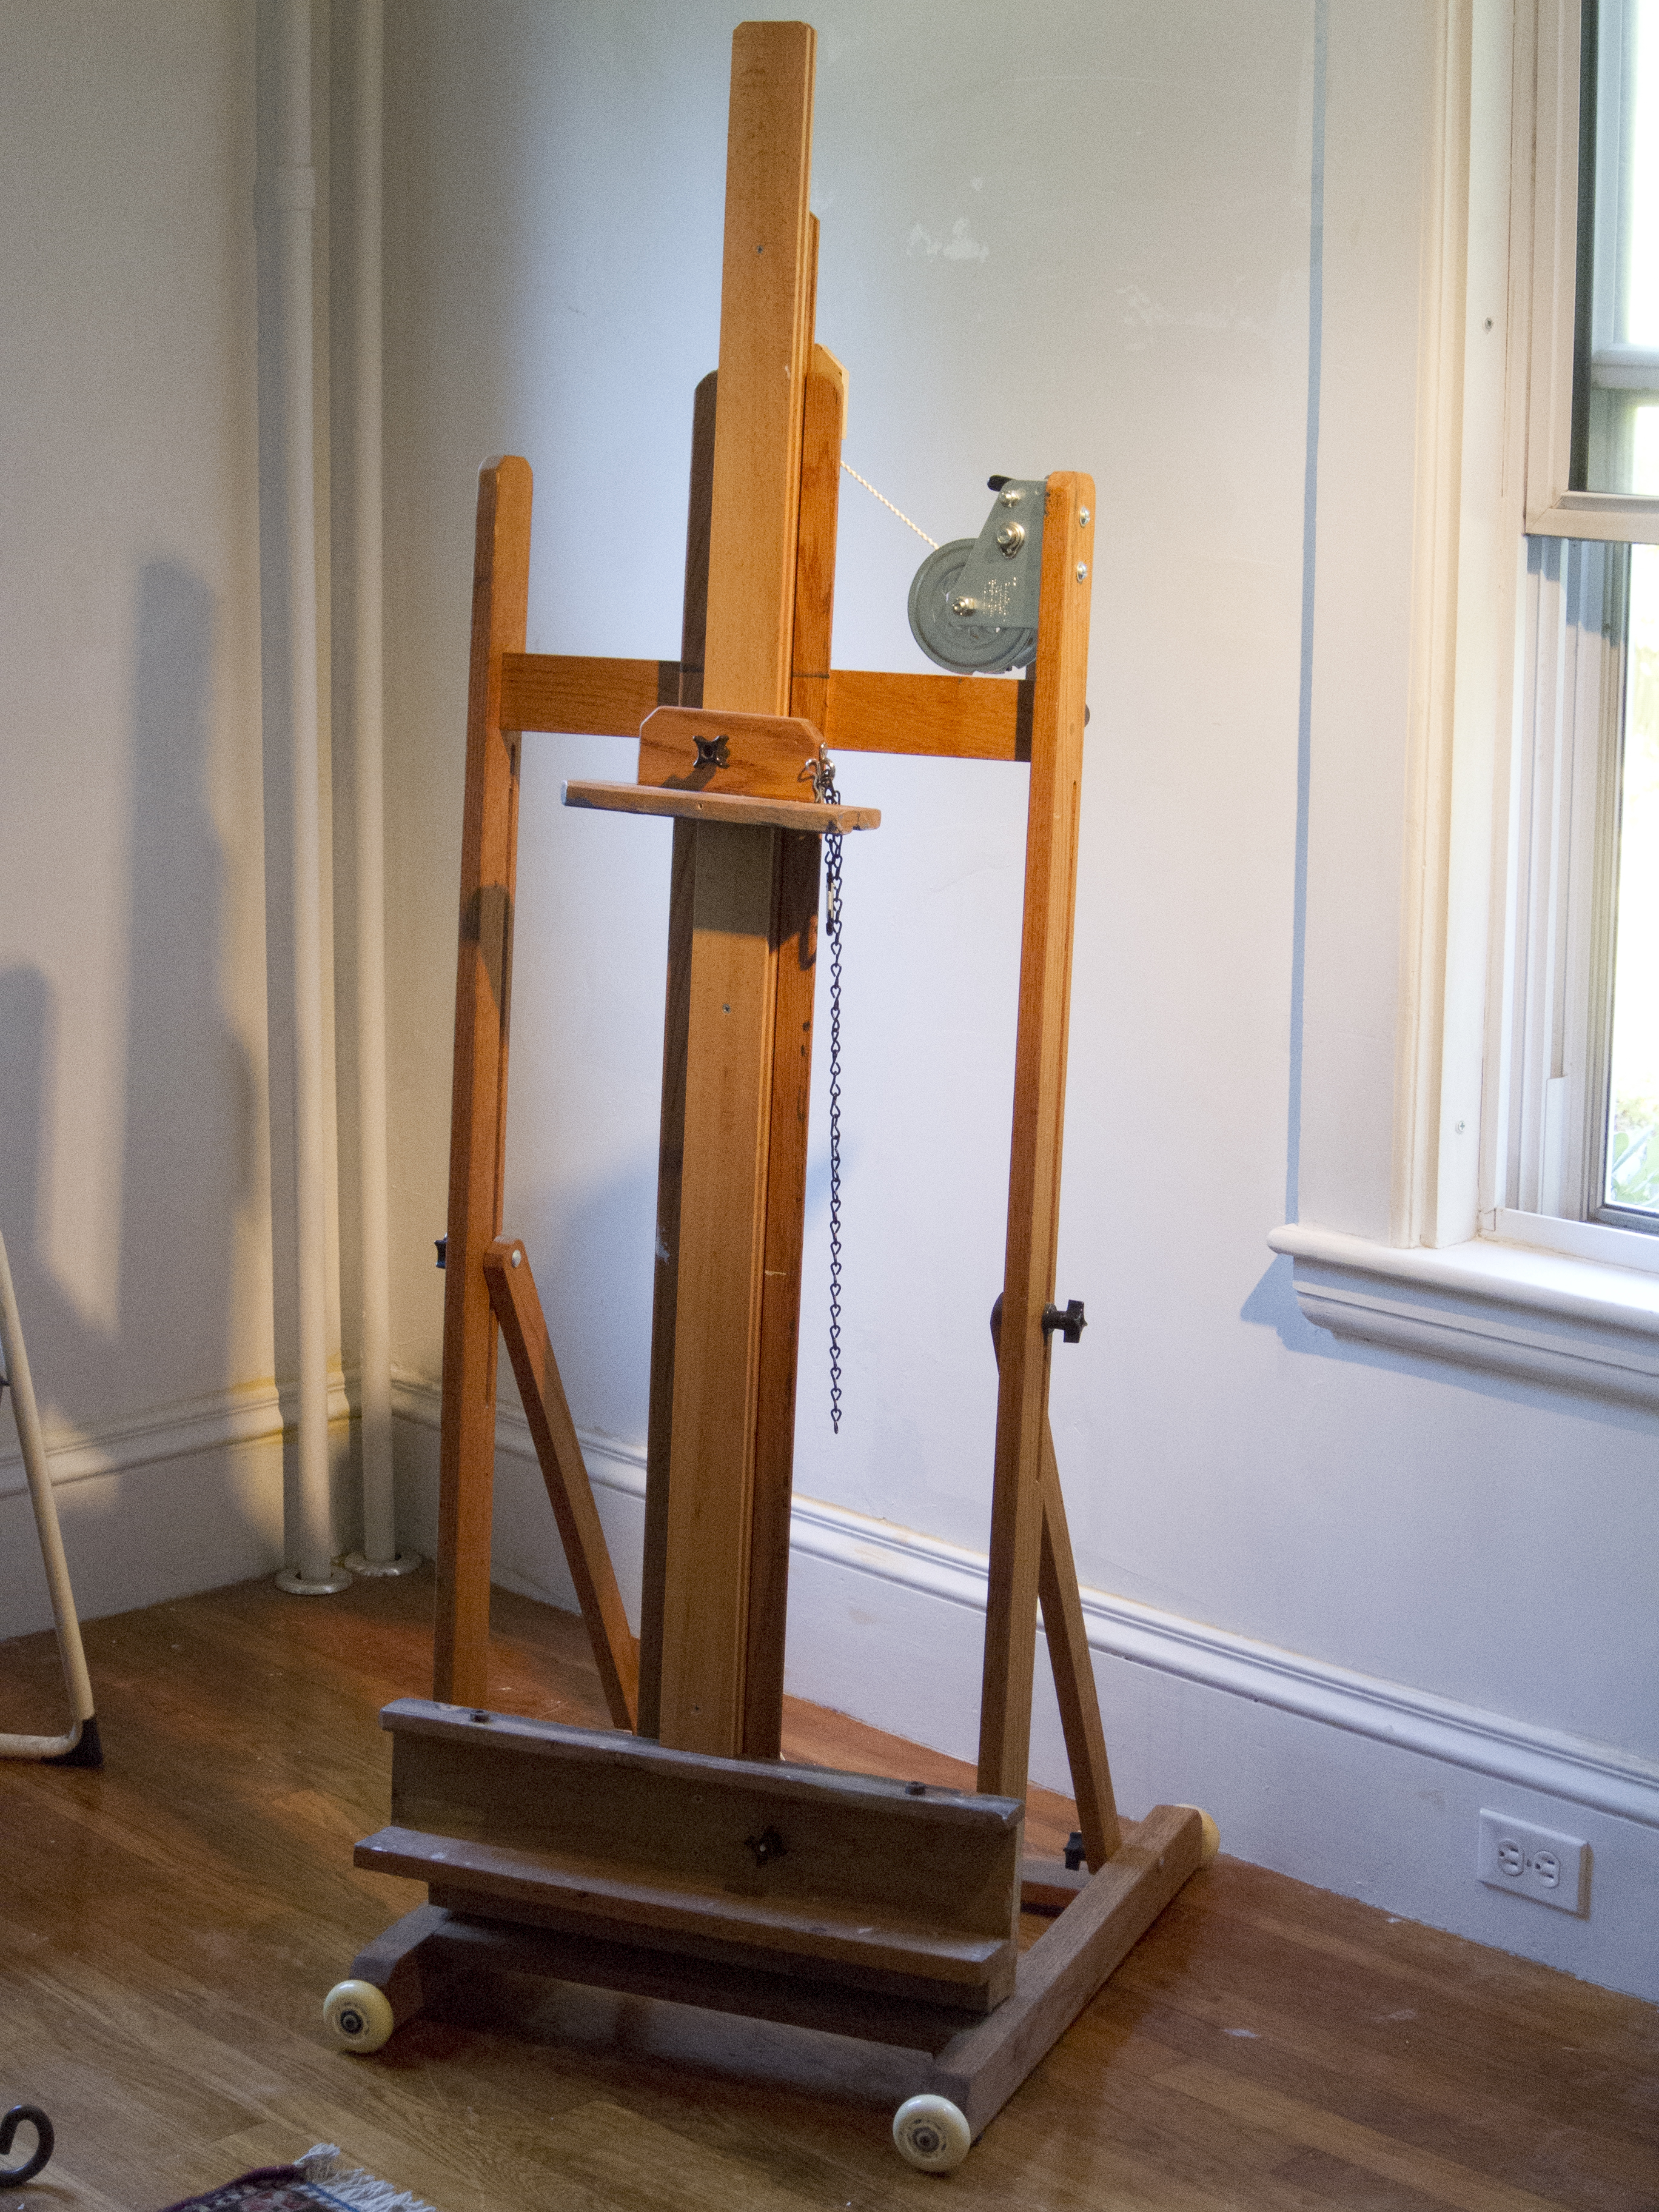


After poking away at this thing I found a few models of artists' easels that have an assembly that holds the painting and moves up and down in one piece.  Seems obvious, right?  Unfortunately, the classic artists' H easel isn't really set up like that, and the ones I found that were, were enormous and expensive.  There are a few varieties, some can be modified and some come that way out of the box.  This easel I found on CL and needed some modification.  Even with all the stuff on it, it's under 40lbs and folds to about 6" flat.

I've found a couple of other things.  Raising and lowering the work really needs some sort of lifting mechanism.  It's just not safe to have a big, valuable painting on the thing and try to muscle it up or down, and it's very difficult to do so at any sort of precise increment.  If you're using a live-view system, you're usually standing between the camera and the work, as well.  The motor drive solves this beautifully, but it's expensive and heavy, and you need to plug it in.  This one uses a hand winch from an ATV trailer - about a $30 part, and does a fantastic job.  
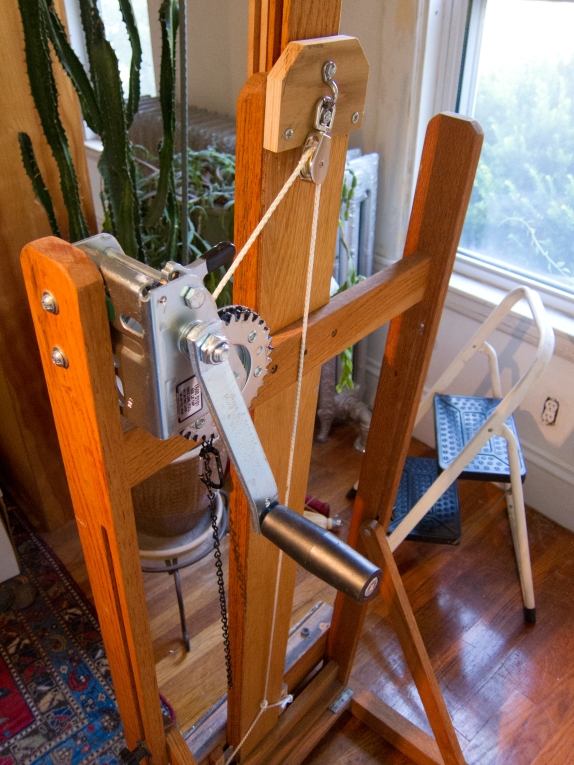


The wheel assembly is just a set of rollerblade wheels.  They work amazingly well. I've mounted them with a good bit of friction so the whole thing doesn't roll by itself, or move when I'm cranking.  I have one more addition to the thing - a clamp that will lock the wheels.  

One seemingly minor addition, but far from unimportant, is a safety clip and wire to keep the work from falling off if somehow it jars loose.  And I've had that happen.  


I'm going to do a little more formal design on the wheel assembly, actually putting a little trolley together that can be easily mounted to any easel.  I've found that about 90% of the work I shoot only needs about three feet of horizontal movement, so you scale that out with a simple tape measure or yardstick.  

The motorized version hasn't changed too much, except the addition of a motorized horizontal drive with remote control.  The truth is, that's nice, but all that stuff adds weight, and most of the time I'm working on location and I'm not getting younger.   ::)  I'm not too far from pulling in some robotic guys and getting help programming and automating the whole affair, but to tell the honest truth, as cool as that would be, it makes something that's fairly cheap, light and elegant into something expensive, heavy and complicated, and for what?  Just the part about not having to double-check for all my cords and remotes and all that, when I'm packing up is enough to put me off that direction.

I have lots of photos of both versions on the site: http://xy-easel.com/

I'm actually thinking of putting a how-to together, or selling kits, or even selling assembled easels.  I could make a little drinkin' money on the side if there's interest, but anybody handy with a drill and a screwdriver with a sharp eye could probably put this together...  
« Last Edit: August 26, 2014, 06:10:01 am by teddillard »
Logged
Ted Dillard

Some Guy

  • Sr. Member
  • ****
  • Offline Offline
  • Posts: 729
Re: My x-y easel - stepping easel for art repro
« Reply #18 on: August 26, 2014, 07:07:51 pm »

Ted, I have some large wall mounted pieces, but they would be a total pain to take off the walls along with their lighting brackets to take somewhere for someone to shoot.  I'd probably bust the expensive museum glass in the process too unless I came up with a rigid crate of some sort for shipping.  Plus, shipping them back and forth would be a fortune too like some find with large canvas-wrapped prints that exceed the UPS box dimensions and then need to go freight.

What if you did the reverse like in cinema?  Put the camera and lights on the dolly and track and moved them left/right and up/down verses moving the art easel?  Sort of an X-Y axis copy stand.  That way you could go to the place to shoot it, and not someone having to take their stuff off the walls or frames to take somewhere and maybe damage them in the process.

SG
Logged

teddillard

  • Sr. Member
  • ****
  • Offline Offline
  • Posts: 717
    • http://www.teddillard.com
Re: My x-y easel - stepping easel for art repro
« Reply #19 on: August 27, 2014, 06:24:03 am »

Obviously you have to weigh the practicality of the various solutions, but here's the thing.  When you move the camera, you have to light the entire area of the artwork.  I just don't see any practical way to move the lights in sync with the camera, and when you consider ambient light in the room, it becomes impossible in my opinion.  You could do it with a room-sized dolly I suppose, but then you're back to a practicality and mobility issue.  

For example - when I shoot a painting I typically use a single gallery-style halogen downspot in conjunction with "North Light" style daylight-temperature window/skylight fill.  Because it gives me a result very similar to the artist's studio and most gallery displays.  My light is at about a 8" height.  I simply don't have the vertical room to move that another 4' higher - not many places would.  

It is, if you think about it, the basic idea behind how a flatbed scanner works.  Keep the lights and the lens in one relative position, and move them in respect to the work as one unit.  Great idea for a small flatbed, but the bigger you get, the more the technical challenges multiply, and not really a great solution for a room-sized "scan".
« Last Edit: August 27, 2014, 08:21:09 am by teddillard »
Logged
Ted Dillard
Pages: [1] 2 3 4   Go Up