Pages: [1] 2 3 4   Go Down

Author Topic: Lightroom 2012 Exposure control different from PS adjustment layer  (Read 28394 times)

Jim Kasson

  • Sr. Member
  • ****
  • Offline Offline
  • Posts: 2370
    • The Last Word

This may be old news to many of you, but I just stumbled on to it and nailed it down. The new(ish) Lightroom exposure control (Process Version 2012) works differently than the Exposure adjustment layer in Photoshop CS 6. While the Lightroom control gives you a convenient way to simulate the shoulder of the film DlogE curve, the Photoshop control works more like the old Lightroom Exposure control (Process version 2010).

The details:

I created a 1/3 stop step wedge in Matlab:


I added a gamma of 2.2, and converted the image to 16 bits per color plane, and wrote it out as a TIFF. I imported it into Lightroom as an Adobe RGB file, and exported TIFFs with the Exposure Control set at 0, +1 EV,  +2 EV, +3 EV, and +4 EV. I brought those images into Photoshop and measured the L* (the luminance channel in CIELab) component of the leftmost steps in each image. Here's what I got:


You can see that the Lightroom Process Version 2012 exposure control tries to avoid blowing out the highlights, unlike increasing exposure in a digital camera. I consider this to be generally a good thing.

Next, I brought the step wedge into Photoshop CS6, added an Exposure adjustment layer, and observed the L* values with the Exposure control set at 0, +1 EV,  +2 EV, +3 EV, and +4 EV.  Here's what I saw:


The Photoshop CS6 Exposure control works more like actually increasing the exposure in a digital camera.

The question this brings up for me is: which is the better way to develop deliberately underexposed images made using "ISO-less" or Unity Gain ISO exposure methods.  I suspect the PS way is better if you're trying to simulate what you'd get if you just turned up the ISO, but that the Lightroom way is better if you want soft clipping of the high values, like you get with film.  It will take some testing for me to figure this out.
« Last Edit: April 14, 2013, 01:42:38 pm by Jim Kasson »
Logged

fdisilvestro

  • Sr. Member
  • ****
  • Offline Offline
  • Posts: 1850
    • Frank Disilvestro
Re: Lightroom 2012 Exposure control different from PS adjustment layer
« Reply #1 on: April 14, 2013, 07:06:11 pm »

The question this brings up for me is: which is the better way to develop deliberately underexposed images made using "ISO-less" or Unity Gain ISO exposure methods.  I suspect the PS way is better if you're trying to simulate what you'd get if you just turned up the ISO, but that the Lightroom way is better if you want soft clipping of the high values, like you get with film.  It will take some testing for me to figure this out.

Thanks for your excellent analysis, as usual.

One of the benefits of using "ISO-less" (with cameras where it makes sense) is that you keep the maximum DR so you have a lot of headroom for highlights. In this case I think the LR way is much better. If you do it the other way (PS or old LR) then you lose whatever you gained going "ISO-less".

Regards

bjanes

  • Sr. Member
  • ****
  • Offline Offline
  • Posts: 3387
Re: Lightroom 2012 Exposure control different from PS adjustment layer
« Reply #2 on: April 14, 2013, 09:52:02 pm »

Jim,

I got similar results with a photographed Stouffer stepwedge with 0.3 EV steps over a range of 40 steps, but using ACR instead of LR. PV2012 rolls off the highlights rather than clipping them (within limits). The +2 EV exposure adjustment places the highlights short of clipping. ACR uses a baseline offset of +0.5 EV for this camera, so one must use a negative exposure compensation of -0.5 EV to correct for this. The ACR preview for this exposure is shown along with results obtained with Imatest on the files rendered into sRGB.

The graph is log-log as with the classical H&D density plots, which is the default for Imatest.

Regards,

Bill


« Last Edit: April 14, 2013, 10:04:49 pm by bjanes »
Logged

Jim Kasson

  • Sr. Member
  • ****
  • Offline Offline
  • Posts: 2370
    • The Last Word
Re: Lightroom 2012 Exposure control different from PS adjustment layer
« Reply #3 on: April 15, 2013, 04:27:54 pm »

One of the benefits of using "ISO-less" (with cameras where it makes sense) is that you keep the maximum DR so you have a lot of headroom for highlights. In this case I think the LR way is much better. If you do it the other way (PS or old LR) then you lose whatever you gained going "ISO-less".

I tend to agree. I think we've determined that LR PV 2012 does a good thing along the grey axis. I will do a little experimenting to see what happens to the two chrominance axes, and to luminance with chromatic inputs.

Jim

Jim Kasson

  • Sr. Member
  • ****
  • Offline Offline
  • Posts: 2370
    • The Last Word
Re: Lightroom 2012 Exposure control different from PS adjustment layer
« Reply #4 on: April 15, 2013, 04:34:29 pm »

I got similar results with a photographed Stouffer stepwedge with 0.3 EV steps over a range of 40 steps, but using ACR instead of LR. PV2012 rolls off the highlights rather than clipping them (within limits). The +2 EV exposure adjustment places the highlights short of clipping. ACR uses a baseline offset of +0.5 EV for this camera, so one must use a negative exposure compensation of -0.5 EV to correct for this. The ACR preview for this exposure is shown along with results obtained with Imatest on the files rendered into sRGB.

Thanks, Bill. It's nice when synthetic and real images produce roughly the same results, and I appreciate your doing the testing. In addition to the real vs simulated test images, you also got some differences because you fed LR raw files, while I fed it TIFFs, and, as you pointed out, it's smart enough (or too smart, depending on your point of view) to apply some corrections automagically. I didn't go into the dark parts of the DlogE (aka H&D) curve, but if I had, I think it would have dropped off much further at low EV boost than the curves you posted, probably because of real world lens flare and surface effects of the wedge.

Jim
« Last Edit: April 15, 2013, 08:10:42 pm by Jim Kasson »
Logged

Jim Kasson

  • Sr. Member
  • ****
  • Offline Offline
  • Posts: 2370
    • The Last Word
Re: Lightroom 2012 Exposure control different from PS adjustment layer
« Reply #5 on: April 15, 2013, 04:52:53 pm »

I spent most of the morning looking at color effects in the LightRoom PV 2012 Exposure control. I made a target consisting of a series of equally spaced patches in CIELab, with an L* of 50, and a* and b* running from -50 to +40 in steps of 10.

Here's the target:


I imported the target into Lightroom, did nothing to it and exported it in ProPhoto RGB. Then I brought it into Photoshop and converted it to Lab, then brought it into Matlab and produced a scatter plot in 3D:


This looks pretty bad until you look at the L* scale. All the values differ infinitesimally.

Looking down from the top, you see this:


Now that we've established the baseline, let's see what happens with a +1EV Exposure boost. First in 3D:


Except for the blues and greens, there is a fair amount of luminance rolloff that increases with chroma.

In 2D, it looks like this:


The yellows and oranges are becoming more chromatic, and the magentas and blues less chromatic.

A +2 EV push gives this in 3D:


And this in 2D:


A three stop push gives this:


and this:


Now even the cyans are rolling off in luminance, but the greens are holding up. As you would wish, the chroma of all the samples is decreasing, with most of the loss in the lower right quadrant -- magentas and blues.

At four stops plus, we see this:


and this:


More of same, basically.

A nit-picker could ask for more consistant chroma scaling, but I think this is pretty good performance. We may be looking as some effects caused by the gamut of ProPhotoRGB.


Jim


« Last Edit: April 15, 2013, 05:04:04 pm by Jim Kasson »
Logged

Jim Kasson

  • Sr. Member
  • ****
  • Offline Offline
  • Posts: 2370
    • The Last Word
Re: Lightroom 2012 Exposure control different from PS adjustment layer
« Reply #6 on: April 15, 2013, 05:13:06 pm »

For completeness, here's what happens when you use the Exposure control to pull.

-1EV:


The reds are a little brighter than you'd like.

In 2D:


Pretty good.

-2EV:


In 2D:


Also not bad.

Note that, because of the nature of CIELab, reducing the amount of light on a reflective surface will result in decreased a* and b* values as well as L*. The reverse is true for increasing the amount of light (a* and b* go up), but in the previous post, this effect was completely overridden by the reduction in chroma caused by the shoulder that Lightroom introduces near clipping.

Jim
« Last Edit: April 15, 2013, 11:02:50 pm by Jim Kasson »
Logged

Jim Kasson

  • Sr. Member
  • ****
  • Offline Offline
  • Posts: 2370
    • The Last Word
Re: Lightroom 2012 Exposure control different from PS adjustment layer
« Reply #7 on: April 16, 2013, 05:15:58 pm »

Yesterday I posted some Lightroom exposure adjustment tests. I now realize that, informative as they were, at least to me, they didn't get directly at the question, "Which is the best exposure tool to use to adjust deliberately underexposed images, the one in Photoshop or the one in Lightroom?" I decided to create a test to answer that question.

The answer: the tool in Photoshop does less damage to the colors, and comes much closer to the tonality and colors that you'd get if you turned up the ISO in the camera. I'm sorry to report that them's the facts, because I really like the soft clipping in the Loghtroom tool.

Here's the experiment. I started with a similar target (11x11, this time) as yesterday, encoded in ProPhoto RGB, the space I normally for Photoshop processing and, except for the gamma, the native color space of Lightroom.  I went to my camera simulator program, and created a new camera. It's in all respects like a Nikon D4, except that it has no noise except for electron and ADC quantizing noise, and a Fovean-like sensor that directly encodes the light into the ProPhoto RGB color space. I know, I know; you could never build a camera like that, especially since two of the PP RGB primaries aren't physically realizable, but I wanted to minimize color space conversions and errors due to demosaicing.

With my simulated camera, I made five exposures of the target, one at the exposure that replicated the target tonality, and one each at - 1EV, -2 EV, - 3EV, and -4 EV from the first exposure. All exposures were made at ISO 640, which is close to the unity gain ISO.

I opened each exposure in Lightroom, and used the exposure control to compensate the four underexposed images to about the same RGB values (in the middle of the image) as the normally exposed image. To my surprise, it didn't take exactly one EV of correction for each EV of underexposure; it took somewhat less.

I exported all the images from Lightroom in ProPhoto RGB, brought them into Photoshop and converted them to CIELab, then brought those images into Matlab and analyzed them.

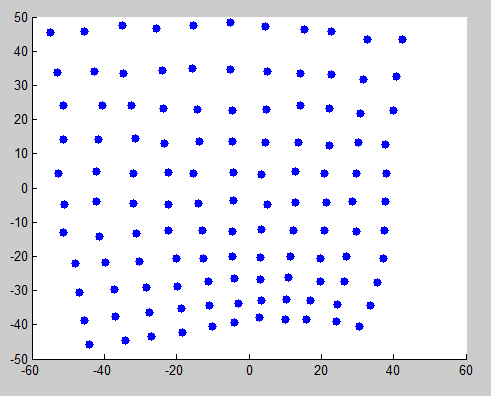
First, I looked at the chromaticity -- only the a* and b* values. Here's the result of a four-stop Lightroom push:


and the result of a four-stop Photoshop push:


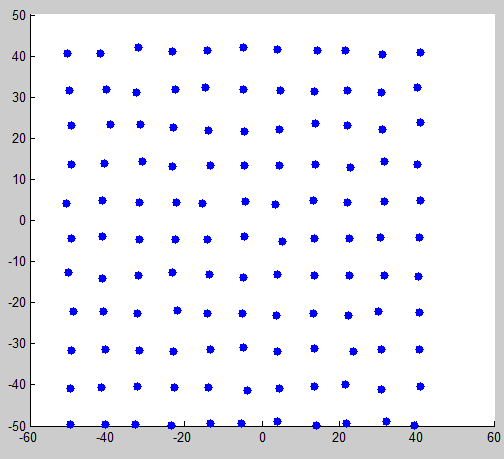
The results of the one, two, and three-stop pushes all share the quality that the Photoshop Exposure tool does less damage to the chromaticity relationships than the analogous Lightroom tool.


More 2D results here.


3D results here.

Jim

« Last Edit: April 16, 2013, 06:09:40 pm by Jim Kasson »
Logged

madmanchan

  • Sr. Member
  • ****
  • Offline Offline
  • Posts: 2115
    • Web
Re: Lightroom 2012 Exposure control different from PS adjustment layer
« Reply #8 on: April 17, 2013, 11:46:16 pm »

It's hard to compare the two directly.  With Ps you can just run the Exposure step and evaluate the before & after.  With Lr, you can't do that because Lr involves a whole pipeline of imaging steps, some of which you can't turn off (like white balance and camera color profiles for raw data).  This is an important distinction because many of the imaging stages in Lr are interrelated and "talk" to each other.  For example, as you increase the Exposure control in Lr (with PV 2012) and push values closer to the high end of the display range, Lr "realizes" that highlight values (and near-highlight values) need to be gamut-mapped (compressed) to minimize unpleasant visual changes. 

As others have noted, PV 2003 or 2010 are much more linear (similar to Ps's Exposure) as you increase the Exposure control (a la in-camera ISO) but a side effect is that when individual color channels start to clip you get unsightly hue shifts (e.g., blue skies become cyan) and a sudden loss of color detail. 

The linear behavior of a digital sensor is a physical reality but not necessarily a desirable visual characteristic.
Logged
Eric Chan

madmanchan

  • Sr. Member
  • ****
  • Offline Offline
  • Posts: 2115
    • Web
Re: Lightroom 2012 Exposure control different from PS adjustment layer
« Reply #9 on: April 17, 2013, 11:47:02 pm »

BTW: interesting potential topic of discussion in about 10 days, right Jim?
Logged
Eric Chan

Schewe

  • Sr. Member
  • ****
  • Offline Offline
  • Posts: 6229
    • http:www.schewephoto.com
Re: Lightroom 2012 Exposure control different from PS adjustment layer
« Reply #10 on: April 17, 2013, 11:55:44 pm »

BTW: interesting potential topic of discussion in about 10 days, right Jim?

Hum...what's gonna happen in about 10 days?
Logged

Jim Kasson

  • Sr. Member
  • ****
  • Offline Offline
  • Posts: 2370
    • The Last Word
Re: Lightroom 2012 Exposure control different from PS adjustment layer
« Reply #11 on: April 18, 2013, 12:15:49 am »

BTW: interesting potential topic of discussion in about 10 days, right Jim?

Right you are, Eric. That's the thing that's got me doing all these experiments. I've got to hold up my end of the bargain.

Looking forward to it...

Jim

Jim Kasson

  • Sr. Member
  • ****
  • Offline Offline
  • Posts: 2370
    • The Last Word
Re: Lightroom 2012 Exposure control different from PS adjustment layer
« Reply #12 on: April 18, 2013, 12:18:53 am »

Hum...what's gonna happen in about 10 days?

Jeff,

Eric, Charles Cramer, Brian Griffith, Lionel Kuhlmann, Rex Naden, and I are going to be doing a one-day workshop on raw processing in Menlo Park.

Here's a link.

Jim

Jim Kasson

  • Sr. Member
  • ****
  • Offline Offline
  • Posts: 2370
    • The Last Word
Re: Lightroom 2012 Exposure control different from PS adjustment layer
« Reply #13 on: April 18, 2013, 12:25:18 am »

For example, as you increase the Exposure control in Lr (with PV 2012) and push values closer to the high end of the display range, Lr "realizes" that highlight values (and near-highlight values) need to be gamut-mapped (compressed) to minimize unpleasant visual changes. 

Eric,

Yes, but I don't think that's what's going on here. I'm just applying enough Exposure adjustment to get the L* values back to about 50. We're a long way from the highlights.

I'm thinking that maybe Lightroom PV 2012 wasn't designed with the correction of intentional underexposures of 3 or 4 stops (like you get when you're following Unity Gain ISO precepts) in mind, but you'd know a heck of a lot more about than than I do.

Jim

Schewe

  • Sr. Member
  • ****
  • Offline Offline
  • Posts: 6229
    • http:www.schewephoto.com
Re: Lightroom 2012 Exposure control different from PS adjustment layer
« Reply #14 on: April 18, 2013, 12:45:34 am »

Eric, Charles Cramer, Brian Griffith, Lionel Kuhlmann, Rex Naden, and I are going to be doing a one-day workshop on raw processing in Menlo Park.

Ooooh, that sounds like fun...if you haven't met Eric yet, you will be charmed! Wish I could make it but I'm in book hell :~(
Logged

bjanes

  • Sr. Member
  • ****
  • Offline Offline
  • Posts: 3387
Re: Lightroom 2012 Exposure control different from PS adjustment layer
« Reply #15 on: April 18, 2013, 08:51:31 am »

Thanks, Bill. It's nice when synthetic and real images produce roughly the same results, and I appreciate your doing the testing. In addition to the real vs simulated test images, you also got some differences because you fed LR raw files, while I fed it TIFFs, and, as you pointed out, it's smart enough (or too smart, depending on your point of view) to apply some corrections automagically. I didn't go into the dark parts of the DlogE (aka H&D) curve, but if I had, I think it would have dropped off much further at low EV boost than the curves you posted, probably because of real world lens flare and surface effects of the wedge.

Jim

Jim,

Your simulations are quite sophisticated and interesting. You might want to apply them to PV2010 as well. Here are data from the same image with PV2010. As Eric stated, it is more linear than PV2010 and lets the highlights clip. As per Eric's comment, how do you handle the camera profile in your simulations?

You are correct about flare. It does lift the shadows even when I mask off the surround of the wedge, as shown by non-linearity in the shadow portion of the graph. The lens was the Nikkor 60 mm f/2.8 AFS which is multicoated and has the Nano coating on selected elements as well, so should have relatively low flare. With the surround of the light table not masked off, flare is quite prominent. Imatest does have an ability to measure veiling flair, but thus far I have not implemented it in my setup.

Bill
« Last Edit: April 18, 2013, 08:53:32 am by bjanes »
Logged

Bart_van_der_Wolf

  • Sr. Member
  • ****
  • Offline Offline
  • Posts: 8913
Re: Lightroom 2012 Exposure control different from PS adjustment layer
« Reply #16 on: April 18, 2013, 09:19:16 am »

You are correct about flare. It does lift the shadows even when I mask off the surround of the wedge, as shown by non-linearity in the shadow portion of the graph. The lens was the Nikkor 60 mm f/2.8 AFS which is multicoated and has the Nano coating on selected elements as well, so should have relatively low flare. With the surround of the light table not masked off, flare is quite prominent. Imatest does have an ability to measure veiling flair, but thus far I have not implemented it in my setup.

Hi Bill,

Nothing new for you, but I can confirm that in every day practice, veiling glare makes a difference. It's a major killer of dynamic range if we are not careful. For critical work, one should attempt to limit the amount of ambient light that enters the front lens element to only the image forming rays, as much as practical. An unpleasantly deep lens shade may help (I use a Lee universal hood if the situation allows). That only leaves direct light-sources in the image to do their thing, but due to the angle of incidence, they are more likely to be affected by the lens coatings.

Cheers,
Bart
Logged
== If you do what you did, you'll get what you got. ==

bjanes

  • Sr. Member
  • ****
  • Offline Offline
  • Posts: 3387
Re: Lightroom 2012 Exposure control different from PS adjustment layer
« Reply #17 on: April 18, 2013, 11:38:32 am »

Hi Bill,

Nothing new for you, but I can confirm that in every day practice, veiling glare makes a difference. It's a major killer of dynamic range if we are not careful. For critical work, one should attempt to limit the amount of ambient light that enters the front lens element to only the image forming rays, as much as practical. An unpleasantly deep lens shade may help (I use a Lee universal hood if the situation allows). That only leaves direct light-sources in the image to do their thing, but due to the angle of incidence, they are more likely to be affected by the lens coatings.

Cheers,
Bart

Bart,

Thanks for the input, which prompts me to post a test I did previously with the Nikon D3. I photographed the Stouffer wedge with and without masking off the glare from the light table as shown and checked the DR with Imatest and there was hardly any difference despite the contaminated shadows from glare in the unmasked shot.


Imatest was able to detect the same number of steps and apparently computed the DR on this basis. However, the usual definition of DR involves the brightest highlight and deepest shadow for a given noise floor. Looking at the Imatest raw data for the patches in question, the sRGB values are shown in the table and converted to linear via the inverse sRGB function. The computed DRs are shown. As a check, I looked at the values in Rawdigger and got the same values for DR. There is a 3 stop difference in DR.


Regards,

Bill
Logged

Jim Kasson

  • Sr. Member
  • ****
  • Offline Offline
  • Posts: 2370
    • The Last Word
Re: Lightroom 2012 Exposure control different from PS adjustment layer
« Reply #18 on: April 18, 2013, 12:18:06 pm »

You might want to apply [the simulations] to PV2010 as well.

Good idea, Bill. I'll do that.

As per Eric's comment, how do you handle the camera profile in your simulations?

I don't think LR uses a camera profile for the files I'm importing. Let me tell you exactly what I do, and then maybe you can comment on whether or no I'm right about that. I export the ProPhoto RGB image from Matlab as a 16=bit TIFF without a profile. I haven't figured out how to add the profile in Matlab, so I bring the image into Photoshop and attach the PPRGB profile. Then I save it as a 16-bit TIFF. I import the file into Lightroom, and export it with no corrections, still in PPRGB,  just to make sure that LR isn't doing some automagic processing that's interfering with what I'm trying to measure. Then I apply the Exposure adjustments, exporting each corrected image as before. Then I bring all the LR-exported images into Photoshop and convert them to Lab. I save all the Lab images, bring them into Matlab, and make the plots.

The image with no LR Exposure corrections looks like the image that I imported into LR ins the first place, which is what makes me think that there is no camera profile applied by LR. This also makes sense to me, since you wouldn't want LR to do something to a finished TIFF image that you imported into LR just to use it's cataloging ability.

Does that make sense to you?

Jim

Bart_van_der_Wolf

  • Sr. Member
  • ****
  • Offline Offline
  • Posts: 8913
Re: Lightroom 2012 Exposure control different from PS adjustment layer
« Reply #19 on: April 18, 2013, 12:27:17 pm »

Imatest was able to detect the same number of steps and apparently computed the DR on this basis.

Hi Bill,

Thanks for the examples. They show that the DR is detectable, but no longer approx. linear, and as such the details in the shadows will have less micro-contrast (and be more sensitive to noise).

Quote
However, the usual definition of DR involves the brightest highlight and deepest shadow for a given noise floor. Looking at the Imatest raw data for the patches in question, the sRGB values are shown in the table and converted to linear via the inverse sRGB function. The computed DRs are shown. As a check, I looked at the values in Rawdigger and got the same values for DR. There is a 3 stop difference in DR.


Indeed, and that is mostly caused by glare from image forming rays which are more efficiently controlled by the lens coatings than the oblique outside the view angle ones that tend to bounce round between or inside lens elements and lens edges and retaining rings. That loss  of contrast is a pity if avoidable by using better technique.

Cheers,
Bart
« Last Edit: April 18, 2013, 12:30:54 pm by BartvanderWolf »
Logged
== If you do what you did, you'll get what you got. ==
Pages: [1] 2 3 4   Go Up