Pages: [1]   Go Down

Author Topic: noise reduction  (Read 1755 times)

leeonmaui

  • Sr. Member
  • ****
  • Offline Offline
  • Posts: 320
noise reduction
« on: March 07, 2009, 03:19:16 pm »

Aloha,

I just came back from the big island where I shot some images of the lava flow, I was forced to shoot at ISO's that are much higher than I normally would attempt. Some of my better shots where done at 640 and 400 I have played around with the noise reduction filter in cs3

does anybody have any advice when working in cs3

I have;

run single pass at full strength

run a doulbe pass at full strength

run passes using per channel

Of course a double pass cleans the image up nicely but strips out a lot of detail.  

Will I just have to trade off detail for a cleaner image?

Any tricks you might know would be appreciated,

Thanks,

Lee


Logged

DarkPenguin

  • Guest
noise reduction
« Reply #1 on: March 07, 2009, 03:26:43 pm »

Not a particularly helpful response but I would run a dedicated noise tool.  Noise Ninja, Neat Image.  Etc.
Logged

ErikKaffehr

  • Sr. Member
  • ****
  • Offline Offline
  • Posts: 11311
    • Echophoto
noise reduction
« Reply #2 on: March 08, 2009, 06:38:54 pm »

Hi,

I second that.

Erik

Quote from: DarkPenguin
Not a particularly helpful response but I would run a dedicated noise tool.  Noise Ninja, Neat Image.  Etc.
Logged
Erik Kaffehr
 

francois

  • Sr. Member
  • ****
  • Offline Offline
  • Posts: 13792
noise reduction
« Reply #3 on: March 10, 2009, 07:30:47 am »

A dedicated noise removal tool is best but did you open your files with ACR and use ACR built-in noise reduction tools? Forlow to medium noisy images, ACR does a good job.
Logged
Francois

pegelli

  • Sr. Member
  • ****
  • Offline Offline
  • Posts: 1664
    • http://pegelli.smugmug.com/
noise reduction
« Reply #4 on: March 10, 2009, 08:34:36 am »

Here's a trick I use in PS CS1 to reduce noise. Should work for other PP programs that can work with layers as well.

Especially with using fill light or other curve adjustments bringing up the shadows you get shadow noise, but not so much in midtones and few in the lighter areas. However if you de-noise the whole picture you lose detail everywhere, also from the mid-tone and lighter areas. Even for normal pictures w/o much fill light I find it useful.

It works with every noise reduction tool/method, and will be very similar for later versions of PS.

Here's the steps:
-1- Open the picture
-2- Create a new layer
-3- Copy the picture on the new layer ([alt][ctrl][shift]E)
-4- De-noise the top layer with whatever method you want to use
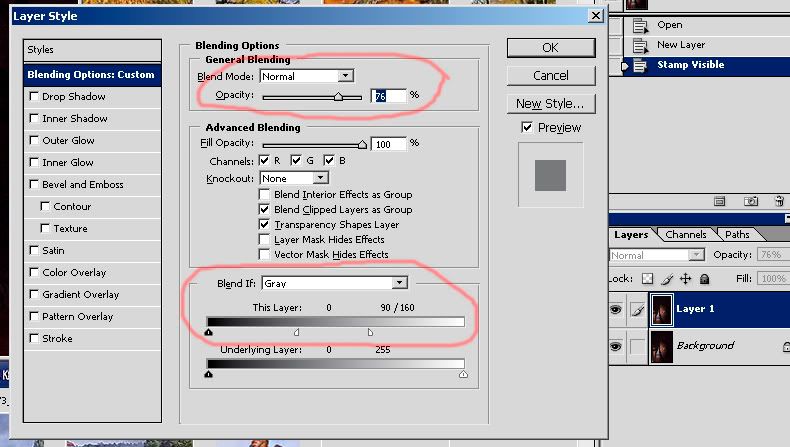
-5- Double click the top layer to open the blend options dialog
-6- I reduce opacity to about 75-90% in the general blending options, choose whatever you like
-7- Adjust the slider in "Blend if" as indicated in the screenshot below.
If you do this you will use the original (bottom layer) image between 255 and 160, from 160 to 90 you gradually increase the noise reduction and below 90 you apply it full (all multiplied with whatever overall opacity you have chosen in the general blending box). In this way you only denoise where there is noise, and you leave the light areas unaffected. The numbers I gave above are just indications what I generally use, but no problem to alter them to achieve the exact effect you want. You can even create a layer mask and paint out areas you don't want affected.

Here's the screenshot of the blend options dialog in Photoshop:


Hope you find this useful.
Logged
pieter, aka pegelli
Pages: [1]   Go Up