Pages: [1] 2   Go Down

Author Topic: TUTORIAL: White balancing JPEG in Photoshop  (Read 10173 times)

Guillermo Luijk

  • Sr. Member
  • ****
  • Offline Offline
  • Posts: 2005
    • http://www.guillermoluijk.com
TUTORIAL: White balancing JPEG in Photoshop
« on: July 10, 2008, 04:42:55 pm »

First of all let me say I know white balancing a JPEG file or any processed image in general is not a new idea.

I simply wanted to apply the theoretical concepts about linear edition and white balance to try to correct a wrong white balance obtaining a result as close to what we would have obtained if the image had been properly white balanced at RAW development, without leaving Photoshop.

White balance implementation is actually an exposure correction of at least 2 of the RGB channels of the image, so I will just convert the wrong white balance image into a linear profile and individually correct exposure of the RGB channels to correct it. In the end the image will be again de-linearized for proper additional edition.

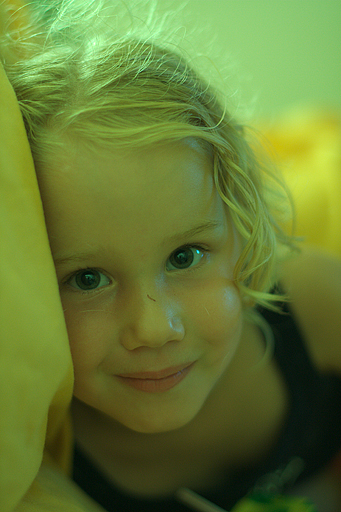
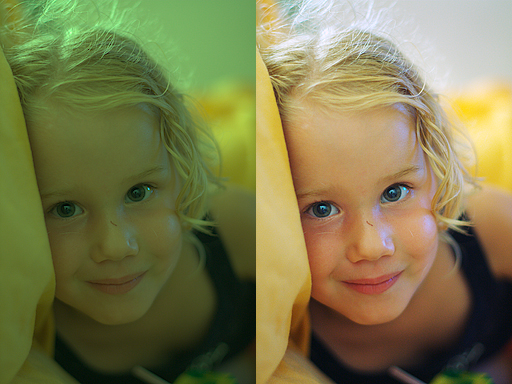
We start from a crazy white-balanced image (JPEG):


1. Convert image to 16 bits to avoid shadow posterization in the next operations

2. Linealize the image from the currect colour profile to some linear profile (linear versions of common profiles can easily be generated just by setting gamma=1.0 in PS). Find here linear versions of both sRGB and Adobe RGB.

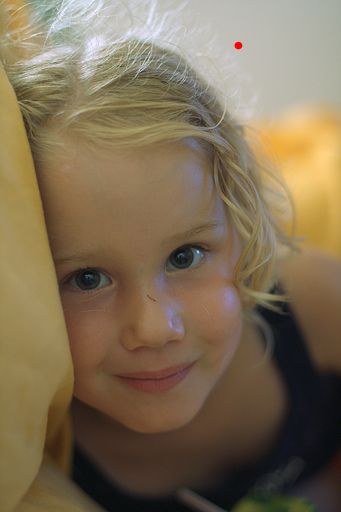
3. With a curve mask layer, we set the white point in any neutral (R=G=B ) area of the original scene. This is a weak point of the method since not all images have truly neutral elements; in those cases some manual trials will be necessary.

In my image I took the white wall in the background:


4. To avoid the burnt areas that the curves produced, we create another curve mask layer and set it between the image and the curve mask layer created in the previous section:


This new curve will be another straigt line to reduce exposure until we get no burnt areas:


5. The last action will be put all layers and image together (CTR+E) and convert again to the desired output profile. This will gamma correct again the image and this is needed since Photoshop is not adequate for linear edition.

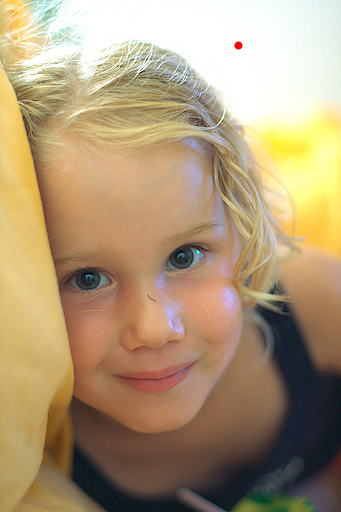
The image will now be properly white balanced and ready to be edited to get the best of it:


NOTE: added after discussion in this thread: the image does not need to be linear to correctly apply the WB correction. Any true gamma* colour profile is ready for a proper WB so steps get reduced to:

1. Convert image to 16 bits to avoid shadow posterization in the next operations

2. With a curve mask layer, we set the white point in any neutral (R=G=B ) area of the original scene. This is a weak point of the method since not all images have truly neutral elements; in those cases some manual trials will be necessary.

3. To avoid the burnt areas that the curves produced, we create another curve mask layer and set it between the image and the curve mask layer created in the previous section

* Only if the original image is sRGB it should be first converted to some true gamma profile (Adobe RGB would do perfect for this purpose).


Explained with more detail in (Spanish): BALANCE DE BLANCOS JPEG.

BR
« Last Edit: July 22, 2008, 11:43:58 am by GLuijk »
Logged

Misirlou

  • Sr. Member
  • ****
  • Offline Offline
  • Posts: 711
    • http://
TUTORIAL: White balancing JPEG in Photoshop
« Reply #1 on: July 10, 2008, 04:45:57 pm »

It would be great if that could be automated with an action, but I guess the sticky part of it would be integrating the prcedure for the selection point.
Logged

madmanchan

  • Sr. Member
  • ****
  • Offline Offline
  • Posts: 2115
    • Web
TUTORIAL: White balancing JPEG in Photoshop
« Reply #2 on: July 10, 2008, 05:19:08 pm »

Thanks for the demo. However, doesn't the approach only work if you can correctly guess the tone curve needed to linearize the image?

There are typically at least 2 curves. First, there is a tone curve that maps the linear raw data to rendered output. Second, there is the gamma curve (e.g., gamma 1.8, gamma 2.2) used when encoding the rendered output into a standard RGB space (e.g., Adobe RGB, ProPhoto RGB). The linearization you propose in step 2 handles the latter case, I believe, but not the former.

Do you agree, or am I missing something in your description?
Logged
Eric Chan

rdonson

  • Sr. Member
  • ****
  • Offline Offline
  • Posts: 3263
TUTORIAL: White balancing JPEG in Photoshop
« Reply #3 on: July 10, 2008, 05:27:51 pm »

Quote
It would be great if that could be automated with an action, but I guess the sticky part of it would be integrating the prcedure for the selection point.
[{POST_SNAPBACK}][/a]

If you want an automated way to deal with it check out [a href=\"http://www.pixelgenius.com/color2/index.html]PhotoKit Color 2[/url]
Logged
Regards,
Ron

Guillermo Luijk

  • Sr. Member
  • ****
  • Offline Offline
  • Posts: 2005
    • http://www.guillermoluijk.com
TUTORIAL: White balancing JPEG in Photoshop
« Reply #4 on: July 10, 2008, 05:46:37 pm »

Quote
Do you agree, or am I missing something in your description?

I agree. But when you are given a processed image it's impossible to find out which toning curves or processes in general were applied to it after the gamma, so I simply ignore them (in fact the original wrong WB image had a deliberate contrast 'S' curve applied).

However it is not strange that the results are fine just with the "linearization" since the gamma curve is by far the one that more deeply affects the histogram distribution.

Standard Gamma 2.2


After gamma is applied, 'S' contrast curves are much softer so they have less effect in the final histogram distribution.
« Last Edit: July 10, 2008, 05:49:24 pm by GLuijk »
Logged

jerryrock

  • Sr. Member
  • ****
  • Offline Offline
  • Posts: 608
    • The Grove Street Photographer
TUTORIAL: White balancing JPEG in Photoshop
« Reply #5 on: July 10, 2008, 08:15:46 pm »

What about opening the jpeg image in ACR and using the temperature/tint sliders or the white balance eye dropper tool?
Logged
Gerald J Skrocki

Guillermo Luijk

  • Sr. Member
  • ****
  • Offline Offline
  • Posts: 2005
    • http://www.guillermoluijk.com
TUTORIAL: White balancing JPEG in Photoshop
« Reply #6 on: July 10, 2008, 09:02:58 pm »

Quote
What about opening the jpeg image in ACR and using the temperature/tint sliders or the white balance eye dropper tool?
what about trying and showing the result?  
should be the same since it's the same process.
« Last Edit: July 10, 2008, 09:03:08 pm by GLuijk »
Logged

Misirlou

  • Sr. Member
  • ****
  • Offline Offline
  • Posts: 711
    • http://
TUTORIAL: White balancing JPEG in Photoshop
« Reply #7 on: July 11, 2008, 12:10:50 am »

Quote
If you want an automated way to deal with it check out PhotoKit Color 2
[a href=\"index.php?act=findpost&pid=207122\"][{POST_SNAPBACK}][/a]

Well, since I never shoot jpgs, I'm not likely to pay very much for something just to white balance them. But Photokit Color can clearly do some other useful tricks too.

Usually, if I'm trying to correct color balance in Photoshop (post raw conversion), I go with the old dinosaur method of placing color samplers and manipulating channel curves until the brightness values even out accross all channels for each sample. Crude and tedious, but effective.

I will try Guillermo's method though. Probably substantially faster.
Logged

Peter_DL

  • Sr. Member
  • ****
  • Offline Offline
  • Posts: 544
TUTORIAL: White balancing JPEG in Photoshop
« Reply #8 on: July 12, 2008, 03:39:19 am »

Quote
I simply wanted to apply the theoretical concepts about linear edition and white balance to try to correct a wrong white balance obtaining a result as close to what we would have obtained if the image had been properly white balanced at RAW development, without leaving Photoshop.

White balance implementation is actually an exposure correction of at least 2 of the RGB channels of the image, so I will just convert the wrong white balance image into a linear profile and individually correct exposure of the RGB channels to correct it. In the end the image will be again de-linearized for proper additional edition.
[a href=\"index.php?act=findpost&pid=207110\"][{POST_SNAPBACK}][/a]
Perhaps just as an academical comment:
Linear scaling and Gamma encoding behave essentially commutative,
means that the sequence can be exchanged while the result will be right the same
provided that the absolute value of the scaling factor gets adapted to the gamma state.

At least this can be shown e.g. in Photoshop for any regular-gamma encoded matrix space and the linear version thereof. Background is that any scaling factor f can be extracted from the exponential gamma term, to be a scaling factor again:
(f x rgb)^(1/g) = f^(1/g) x rgb^(1/g)

Peter

--
« Last Edit: July 12, 2008, 03:40:48 am by DPL »
Logged

Guillermo Luijk

  • Sr. Member
  • ****
  • Offline Offline
  • Posts: 2005
    • http://www.guillermoluijk.com
TUTORIAL: White balancing JPEG in Photoshop
« Reply #9 on: July 12, 2008, 07:20:33 am »

Quote
any scaling factor f can be extracted from the exponential gamma term, to be a scaling factor again:
(f x rgb)^(1/g) = f^(1/g) x rgb^(1/g)
Great! thanks a lot for this remark Peter. I feel embarrashed now for having insisted so much in the linear edition since there is actually no need to convert to a gamma=1.0 profile to apply the WB correction using straight curves. The procedure can be applied to an image on any profile as long as it has a pure gamma scaling.

That would exclude sRGB which should necessarily be converted to some pure gamma profile like Adobe RGB before applying the technique. Now I see that the 'Exposure' tool in Photoshop really works as a true exposure control, not a bit fake as I used to think. It even takes into account the sRGB non-pure gamma behaviour in the shadows; in the past I calculated that when applied to a sRGB image, this tool performs equivalent to a curve like:


Photoshop compensates the non-pure gamma behaviour of the sRGB curve near 0.

Thank you, your comment was very claryfying.
« Last Edit: July 13, 2008, 05:57:45 am by GLuijk »
Logged

Jonathan Wienke

  • Sr. Member
  • ****
  • Offline Offline
  • Posts: 5829
    • http://visual-vacations.com/
TUTORIAL: White balancing JPEG in Photoshop
« Reply #10 on: July 12, 2008, 08:26:42 am »

Quote
Photoshop compensates the non-pure gamma behaviour of the sRGB curve near 0.

Photoshop does most internal color calculations in LAB, because otherwise the results of color adjustments would be very inconsistent depending on the editing space you are using. If you were editing an image with a printer profile that had a lumpy TRC, doing color corrections on actual RGB values would cause very strange results. That is how the odd TRC of sRGB is compensated for. This is another reason to do all editing in 16-bit mode, because many operations do a round-trip from RGB to LAB to RGB.
« Last Edit: July 12, 2008, 08:29:13 am by Jonathan Wienke »
Logged

Peter_DL

  • Sr. Member
  • ****
  • Offline Offline
  • Posts: 544
TUTORIAL: White balancing JPEG in Photoshop
« Reply #11 on: July 13, 2008, 06:20:32 am »

Quote
That would exclude sRGB which should necessarily be converted to some pure gamma profile like Adobe RGB before applying the technique. [{POST_SNAPBACK}][/a]
Yep. While otherwise being advantageous, the lower starting slope of the sRGB TRC can indeed affect proper white balance in terms of linear scaling. It may be worth to note that aside from spaces with such 'shadow bump', some irregularities can also be observed in the deepest shadows of a 2.2 gamma space such as Adobe RGB. This might be due to the slope limiting feature of the Adobe color engine (see last page of the specs): [a href=\"http://www.adobe.com/digitalimag/pdfs/AdobeRGB1998.pdf]http://www.adobe.com/digitalimag/pdfs/AdobeRGB1998.pdf[/url]

Peter

--
Logged

Guillermo Luijk

  • Sr. Member
  • ****
  • Offline Offline
  • Posts: 2005
    • http://www.guillermoluijk.com
TUTORIAL: White balancing JPEG in Photoshop
« Reply #12 on: July 13, 2008, 06:47:05 am »

Thanks for your point Jonathan.

Quote
Yep. While otherwise being advantageous, the lower starting slope of the sRGB TRC (...)
Peter, what are the practical advantages of the linear segment in sRGB gamma encoding for edition? I have heard a pure gamma could cause problems because of it high slope near 0, but never found these problems when writing programs to process images dealing with gamma.

Moreover, one of the reasons for which I don't like to edit on sRGB is that with Photoshop curves, which are actually not very accurate in the shadows, sRGB's higher compression near 0 makes it more difficult to accurately edit levels and level aggregation risk gets higher.

So where can we really find an advantage in sRGB for image processing? for final rendering and distribution is the standard, but everytime I find less reasons (leaving aside its smaller gamut of course) to use it into an edition workflow.

BR

madmanchan

  • Sr. Member
  • ****
  • Offline Offline
  • Posts: 2115
    • Web
TUTORIAL: White balancing JPEG in Photoshop
« Reply #13 on: July 13, 2008, 10:17:20 am »

Having a limited slope is useful computationally, such as when encoding the inverse function in a lookup table, or if you need derivatives.
Logged
Eric Chan

Peter_DL

  • Sr. Member
  • ****
  • Offline Offline
  • Posts: 544
TUTORIAL: White balancing JPEG in Photoshop
« Reply #14 on: July 13, 2008, 11:19:07 am »

Quote
Peter, what are the practical advantages of the linear segment in sRGB gamma encoding for edition?
[{POST_SNAPBACK}][/a]
Guillermo, - for me it’s about the side effects from blackpoint setting
(see below quotes from an earlier [a href=\"http://luminous-landscape.com/forum/index.php?showtopic=24701&st=20]discussion[/url]).

Peter

--
Quote: … Now let’s take a brief, 3-step grayscale in Adobe RGB with dark grays of RGB 9, 16 and 21. In a copy file (!) and converted to sRGB (!), this makes 4, 7 and 13. Understandable, due to the lower local 'gamma' of sRGB. Nonetheless, both grayscales should look right the same on screen.

The next step is mentioned ‘image editing practice’ to move the Levels’-blackpoint slider towards a value where the first patch reaches zero. In case of Adobe RGB, the value for BP setting is 9. In case of sRGB, the value for BP setting is just 4 (see above numbers). Now what is the result. The grayscale in Adobe RGB turns to RGB 0, 7 and 12. Whereas with the copy file ‘in’ sRGB the new grayscale is 0, 4 and 9. Big difference!

Zero to 12 in Adobe RGB corresponds to below / equal L* 1. A critical range and the grayscale tends to disappear on screen. Zero to 9 in sRGB goes up to L* 3. The steps should stay clearly visible on screen or print. Just give it a try.<<

Another aspect is that a numerically lower BP setting is less damaging for Color integrity a la David Dunthorn.
 
--
Quote: … Say we have a dark gray of linear RGB 2 which shall be brought to zero. In a linear space it just requires to set the Black-point slider 2 levels to the right. Done. Now in a regular 2.2 gamma space, same dark gray is indicated by an RGB of 28. Means to get it zero (and zero is always the same independent from gamma) we will have to move the Levels’ Black-point slider 28 units to the right.

Q:  So what ?
A:  Problem with this much stronger move is a considerable stronger effect on all other RGB data. It’s an unnatural operation so to speak. In detail this can result in:
a.) posterization of shadow details (see my post above),
b.) an undesired increase of color saturation, starting from the shadows with decreasing significance towards the highlights, unless of course you would find this particularly pleasing.
Logged

Peter_DL

  • Sr. Member
  • ****
  • Offline Offline
  • Posts: 544
TUTORIAL: White balancing JPEG in Photoshop
« Reply #15 on: July 18, 2008, 04:19:22 pm »

Sorry – didn’t want to interrupt discussion. Please ignore my comments, nothing weakened the initially suggest procedure [maybe except madmanchan’s polite remark #3: "There are typically at least 2 curves. First, there is a tone curve that maps the linear raw data to rendered output. Second, there is the gamma curve … The linearization you propose in step 2 handles the latter case, I believe, but not the former."].

No pb to step aside again.

Peter

--
Logged

tagor

  • Newbie
  • *
  • Offline Offline
  • Posts: 16
TUTORIAL: White balancing JPEG in Photoshop
« Reply #16 on: July 19, 2008, 05:02:34 am »

Quote
Photoshop does most internal color calculations in LAB, because otherwise the results of color adjustments would be very inconsistent depending on the editing space you are using. If you were editing an image with a printer profile that had a lumpy TRC, doing color corrections on actual RGB values would cause very strange results. That is how the odd TRC of sRGB is compensated for. This is another reason to do all editing in 16-bit mode, because many operations do a round-trip from RGB to LAB to RGB.
[{POST_SNAPBACK}][/a]
That is quite wrong. The only thing that I found that might be using Lab space is the noise filter. The exposure adjustment definitely does not do a profile round trip to Lab. If you want, you can try a profile I created that has A2B and B2A tables set to 0 (any operation doing an internal conversion to Lab will result in an image with all color values set to 0):

[a href=\"http://tiloni.com/naturescapes/test_profile_zero.icc]http://tiloni.com/naturescapes/test_profile_zero.icc[/url]

-- Tilo
Logged

Peter_DL

  • Sr. Member
  • ****
  • Offline Offline
  • Posts: 544
TUTORIAL: White balancing JPEG in Photoshop
« Reply #17 on: July 19, 2008, 06:34:12 am »

Quote
That is quite wrong. The only thing that I found that might be using Lab space is the noise filter. The exposure adjustment definitely does not do a profile round trip to Lab. If you want, you can try a profile I created that has A2B and B2A tables set to 0 (any operation doing an internal conversion to Lab will result in an image with all color values set to 0):

http://tiloni.com/naturescapes/test_profile_zero.icc

-- Tilo
[a href=\"index.php?act=findpost&pid=209337\"][{POST_SNAPBACK}][/a]
Partly wrong or correct. For example, selections > color range via sampling points as recorded by an Action indicate Lab data.  Other tools, e.g. some sliders (not all) of Shadow/Highlight seem to resort to HSL blend modes (behind the scenes). But, Levels or Curves which are of concern here appear to be purely RGB based, in a way that’s almost impossible to mimic via Lab. Agree with your comment on “exposure adjustments”.

Sorry – wanted to keep quiet to listen.
Interesting level of discussion though.

Peter

--
Logged

digitaldog

  • Sr. Member
  • ****
  • Offline Offline
  • Posts: 20646
  • Andrew Rodney
    • http://www.digitaldog.net/
TUTORIAL: White balancing JPEG in Photoshop
« Reply #18 on: July 19, 2008, 09:26:51 am »

Actual conversions to and from Lab (as you'd do in Mode Change) are too slow and unnecessary. What Photoshop does is it builds a conversion table and to do so, it uses LAB to find the equivalents from source to destination in cases where it needs to translate such color spaces, using 20-bit precision so you get less quantization errors than you would actually converting the pixels to LAB.
Logged
http://www.digitaldog.net/
Author "Color Management for Photographers".

bjanes

  • Sr. Member
  • ****
  • Offline Offline
  • Posts: 3387
TUTORIAL: White balancing JPEG in Photoshop
« Reply #19 on: July 20, 2008, 08:57:23 am »

Quote
Sorry – didn’t want to interrupt discussion. Please ignore my comments, nothing weakened the initially suggest procedure [maybe except madmanchan’s polite remark #3: "There are typically at least 2 curves. First, there is a tone curve that maps the linear raw data to rendered output. Second, there is the gamma curve … The linearization you propose in step 2 handles the latter case, I believe, but not the former."].

No pb to step aside again.

Peter

--
[{POST_SNAPBACK}][/a]

Peter,

I found your comments valuable, since I had previously thought that white balance could not easily be performed with a gamma 2.2 image because of the non-linearity thus introduced.

To explore the commutative nature of linear scaling and gamma encoding, I did an experiment with [a href=\"http://www.astrosurf.com/buil/us/iris/iris.htm]Iris[/url], an excellent freeware program popular with astronomers and experimenters.

I used an image of a Macbeth color checker taken with the Nikon D200 under daylight illumination and used Iris for raw conversion subsequent processing. Here is the raw image after demosaicing in Iris. It is dark, since gamma is one. It is also green due to lack of white balance.

[attachment=7550:attachment]

The normal processing flow is to do white balance first, then apply the gamma, and finally one may want to use a curve to improve contrast and set the black and white points. Here is the raw image after white balancing; Iris used the following RGB multipliers: 1.878, 1.0, 1.310.

[attachment=7551:attachment]

If one applies a gamma of 2.2 and then performs white balance, the multipliers are 1.33, 1.0, and 1.127. The results are the same of one uses the reverse order, confirming the commutative nature of the operations.

[attachment=7552:attachment]

Contrast is poor and the black point is too high, and one can improve the results with a curve:

[attachment=7553:attachment]

Here is the final result:

[attachment=7554:attachment]
Logged
Pages: [1] 2   Go Up