Pages: [1] 2   Go Down

Author Topic: Soft Proofing Techniques  (Read 3651 times)

praja343

  • Full Member
  • ***
  • Offline Offline
  • Posts: 137
Soft Proofing Techniques
« on: February 19, 2018, 10:39:41 pm »

The soft proofing technique I have been using is by "trial and terror" method i.e. make an image duplicate, view>proof setup>custom>choose printer and paper and then compare the copy to the original by tiling the original and copy or using the preview button to see what changes I need to make.

Usually, the proof copy is slightly less bright, less contrasty and less saturated. I then make changes in curve and hue saturation to get approximately the same look and save that as my proofing adjustment. The print then becomes the final arbiter.

Does anyone have better ideas to match the softproof to the original? I cannot afford image print or any RIPs. I was thinking if I could sample the RGB values at different coordinates (brightest, darkest, most saturated etc. - say half a dozen different points) of the original and the same coordinates of the proof copy, that will give me better control of what I need to do (e.g. x=5.195, y=3.658 R=187, G=34 B=10 in the original and find out what it is the proof say R=176, G = 28, B=4 then I can adjust the RGB curves independently to get close to original) but I cannot copy the co-ordinates exactly using only the mouse  for these points from the original to the proof so I cannot the corresponding RGB values. So how can I copy the specific (x,y) coordinates from the original and paste them on the proof copy to get the corresponding location exactly on the proof copy and get the corresponding RGB values precisely? In other words how can I get the cursor to x=5.195, y=3.658 exactly in proof copy so I can measure the RGB values at that location? That way I could get the two images closer rather than eyeballing it.

Are there other "rules of thumb"? that members of the forum use? Is what I propose to do too complex and should I just stick to the old method? Any suggestions would be welcome.

Thanks.

Logged

Mark D Segal

  • Contributor
  • Sr. Member
  • *
  • Offline Offline
  • Posts: 12512
    • http://www.markdsegal.com
Re: Soft Proofing Techniques
« Reply #1 on: February 20, 2018, 09:21:48 am »

I don't think you can do this by the numbers. The softproof shows you a reduced dynamic range and a narrower gamut than the non-softproof because that is the reality of what the printing technology can deliver, so a great many of the numbers can't be the same between the two. That's the whole problem. The difference cannot be erased by replication. Furthermore, even if you could replicate a number of specific points in the image as you suggest you want to do, that won't assure you have a desirable result under softproof. With softproofing, the whole image is at play in terms of how one sees relations say of micro-contrast between neighbouring pixels - millions of them - and macro-contrast between regions of the photo. I don't see how the proposed approach would readjust these relationships reliably and appropriately.

It is, I believe, a situation where we try to replicate the visual impression of the non-softproof by enhancing micro and macro contrast and perhaps some vibrancy using those bespoke tools and depending on our visual impression for evaluating the results. In fact, I print many photos every year and I pay no attention to the non-softproof apart from an initial view of it, because I know it is not relevant to everything that comes next. To me, the most important issues are the tonal and colour relationships that can be achieved and look best for that photo with whatever paper and printer I'm using. So I'm comparing a range of editing possibilities all within the constraints of the softproof to see what looks best for the photo. My image editing objective is to make the most appropriate edits under softproof of the image that I can. Maybe there are better ways but I haven't either discovered or read of them.
Logged
Mark D Segal (formerly MarkDS)
Author: "Scanning Workflows with SilverFast 8....."

digitaldog

  • Sr. Member
  • ****
  • Offline Offline
  • Posts: 20651
  • Andrew Rodney
    • http://www.digitaldog.net/
Re: Soft Proofing Techniques
« Reply #2 on: February 20, 2018, 10:34:04 am »

Soft proofing is all about a close(er) visual match between the output and what you see on the display so display calibration is super critical. Also using the Simulate check boxes for ink and paper is key. And most importantly, it's used to select the rendering intent you desire for the conversion. You can't pick without seeing the options.
Logged
http://www.digitaldog.net/
Author "Color Management for Photographers".

Doug Gray

  • Sr. Member
  • ****
  • Offline Offline
  • Posts: 2197
Re: Soft Proofing Techniques
« Reply #3 on: February 21, 2018, 01:53:16 am »

In addition to what Andrew said there are a few points that might get you closer to a WYSIWYG

If you have a properly calibrated monitor AND you have a hard proof viewing station that are set so the luminosity and xy coordinates match and you have OBA free paper then:

Checking the show paper color box should provide reasonably close matching to a print. OTOH, if your monitor is set for D65 and your print viewing station is different or located elsewhere, you are probably better off just checking the show black check box. This is because you color adapt to the white. Checking the show paper white will reduce the brightness slightly because the paper profile contains the actual, reduced, white point of the paper. This can be disconcerting until you are used to it. It's also most effective if the print is viewed alongside the monitor.

Now, when you view a soft proof with Relative Colorimetric w/o BPC and with the paper white unchecked, you should see very little change if your image is within the paper's gamut. The most likely differences will be the darkest shadow areas and if you have colors below the L* limit of the paper you will see blocking. This can be accommodated by using BPC but that will also produce a tone shift. Alternately, you can raise the blacks using curves to just the point where the blacks are no longer blocked. This can often be more effective than using BPC which assumes the image has blacks that go all the way to 0. If you do that then you will see almost no change in the image which viewing soft proof. It basically does what BPC does but in the image. Best way to do it is in an adjustment layer so you don't mess with the original image.

If you have colors outside the printer's gamut you will, of course, see a change in those areas of the image.

Soft proofing and printing with Perceptual will always produce an image change. Perceptual can produce quite attractive results but you have to expect soft proofing and printing to differ from the original.
Logged

Mark D Segal

  • Contributor
  • Sr. Member
  • *
  • Offline Offline
  • Posts: 12512
    • http://www.markdsegal.com
Re: Soft Proofing Techniques
« Reply #4 on: February 21, 2018, 08:14:24 am »

In addition to what Andrew said there are a few points that might get you closer to a WYSIWYG

If you have a properly calibrated monitor AND you have a hard proof viewing station that are set so the luminosity and xy coordinates match and you have OBA free paper then:

Checking the show paper color box should provide reasonably close matching to a print. OTOH, if your monitor is set for D65 and your print viewing station is different or located elsewhere, you are probably better off just checking the show black check box. This is because you color adapt to the white. Checking the show paper white will reduce the brightness slightly because the paper profile contains the actual, reduced, white point of the paper. This can be disconcerting until you are used to it. It's also most effective if the print is viewed alongside the monitor.

Now, when you view a soft proof with Relative Colorimetric w/o BPC and with the paper white unchecked, you should see very little change if your image is within the paper's gamut. The most likely differences will be the darkest shadow areas and if you have colors below the L* limit of the paper you will see blocking. This can be accommodated by using BPC but that will also produce a tone shift. Alternately, you can raise the blacks using curves to just the point where the blacks are no longer blocked. This can often be more effective than using BPC which assumes the image has blacks that go all the way to 0. If you do that then you will see almost no change in the image which viewing soft proof. It basically does what BPC does but in the image. Best way to do it is in an adjustment layer so you don't mess with the original image.

If you have colors outside the printer's gamut you will, of course, see a change in those areas of the image.

Soft proofing and printing with Perceptual will always produce an image change. Perceptual can produce quite attractive results but you have to expect soft proofing and printing to differ from the original.

Let's revert to the point Andrew made that the main purpose of softproofing is to use the display for predicting what comes out of the printer. I think the O/P knows this - he's just looking for more systematic ways of operating it than visually checking back and forth. the use of BPC, Perceptual or Relative Intents are all choices that have differing impact on the softproof and the print depending on gamut and the extent of out-of-gamut (OOG colours). As long as simulating Black Ink and Paper White are activated in the softproof, it will show the differences any of these options will make to the print, and that is conform with its purpose, so I would simply underline Andrew's point that for softproofing to be useful these conditions must be active. The extent of the difference between a softproof and a non-softproof depends in the first instance on the gamut of the printer profile and the extent of OOG colours. The narrower the gamut and the more that is OOG, the larger the difference will be. When everything is in-gamut softproofing shows very little difference. Softproofing generally shows more difference for matte papers than luster papers because the gamut of matte is generally narrower than that of luster. Because Perceptual remaps both in-gamut and OOG pixels much more (and differently) than Relative does, Perceptual will display more difference than Relative the narrower the gamut and the greater the OOG presence as well. But in the final analysis, what matters most in this exercise is the combination of settings that produces the most satisfactory softproof in the mind of the user, and we only know this by testing the options and observing the impacts.
Logged
Mark D Segal (formerly MarkDS)
Author: "Scanning Workflows with SilverFast 8....."

Doug Gray

  • Sr. Member
  • ****
  • Offline Offline
  • Posts: 2197
Re: Soft Proofing Techniques
« Reply #5 on: February 21, 2018, 11:16:12 am »

Let's revert to the point Andrew made that the main purpose of softproofing is to use the display for predicting what comes out of the printer. I think the O/P knows this - he's just looking for more systematic ways of operating it than visually checking back and forth. the use of BPC, Perceptual or Relative Intents are all choices that have differing impact on the softproof and the print depending on gamut and the extent of out-of-gamut (OOG colours). As long as simulating Black Ink and Paper White are activated in the softproof, it will show the differences any of these options will make to the print, and that is conform with its purpose, so I would simply underline Andrew's point that for softproofing to be useful these conditions must be active. The extent of the difference between a softproof and a non-softproof depends in the first instance on the gamut of the printer profile and the extent of OOG colours. The narrower the gamut and the more that is OOG, the larger the difference will be. When everything is in-gamut softproofing shows very little difference. Softproofing generally shows more difference for matte papers than luster papers because the gamut of matte is generally narrower than that of luster. Because Perceptual remaps both in-gamut and OOG pixels much more (and differently) than Relative does, Perceptual will display more difference than Relative the narrower the gamut and the greater the OOG presence as well. But in the final analysis, what matters most in this exercise is the combination of settings that produces the most satisfactory softproof in the mind of the user, and we only know this by testing the options and observing the impacts.

Yep, this is all true but I was addressing the OP's question: "Does anyone have better ideas to match the softproof to the original?"

Relative Colorimetric w/o BPC will do that IF the image is in gamut. As you point out that is more of an issue with matte prints but when the image is in gamut Relative Colorimetric soft proof (and print) will match the original image quite closely. That is the primary use of Rel. Col.

When I use Rel. Col. but have a problem with OOG deep shadows (especially with matte) I prefer to adjust the image with curves to using BPC. BPC is rather heavy handed assuming the image will have blacks that go to L*=0.  This is often not the case and, if so, adjusting the image with curves accomplishes less of a tone shift in the print or soft proof.

If the image is significantly OOG nothing will make the softproof match the original and one normally chooses the intent that produces the most pleasing results and accepts the differences from the original.
Logged

Schewe

  • Sr. Member
  • ****
  • Offline Offline
  • Posts: 6229
    • http:www.schewephoto.com
Re: Soft Proofing Techniques
« Reply #6 on: February 22, 2018, 03:00:11 am »

Are there other "rules of thumb"? that members of the forum use? Is what I propose to do too complex and should I just stick to the old method? Any suggestions would be welcome.

Well, nobody has said the obvious that for me, soft proofing is NOT used to match the image before soft proofing but to evaluate the image and how it will look on the printer and media of choice.

Yes, all the tutorials seem to be about matching the original image before soft proofing but what I really use soft proofing for these days is how to adjust the image to look as good as possible with the ink/paper combination. Soft proofing allows me to tweak the image to get the best print possible regardless of where it may have started.

The other thing I use soft proofing for is evaluating what media to choose for a particular image...sometimes I want to print on specific papers such as a matte fiber or textured watercolor paper. Buy using soft proofing I can see what the image will look like on a low dynamic range matte paper. Sometimes, based on the soft proofing, I'll just pass on trying to get an image to look good on that paper and print on a higher dynamic range paper like a luster or glossy.

Other times, I'll actually use soft proofing to choose what image to actually bother to work on. I'll use soft proofing to help select the best image–this is particularly true when shooting for halftone reproduction. Sometimes I'll need to change to lighting to open things up or add lights to pop an edge or enhance texture...

These are things that soft proofing can be used for...not just to make print match your RGB display.

Also note that soft proofing accurately requires a very accurately calibrated and profiles display (something the OP didn't mention) and a viewing environment that makes evaluating the actual print accurately and consistently...

This is my imaging room (well, it's a couple of years old now)


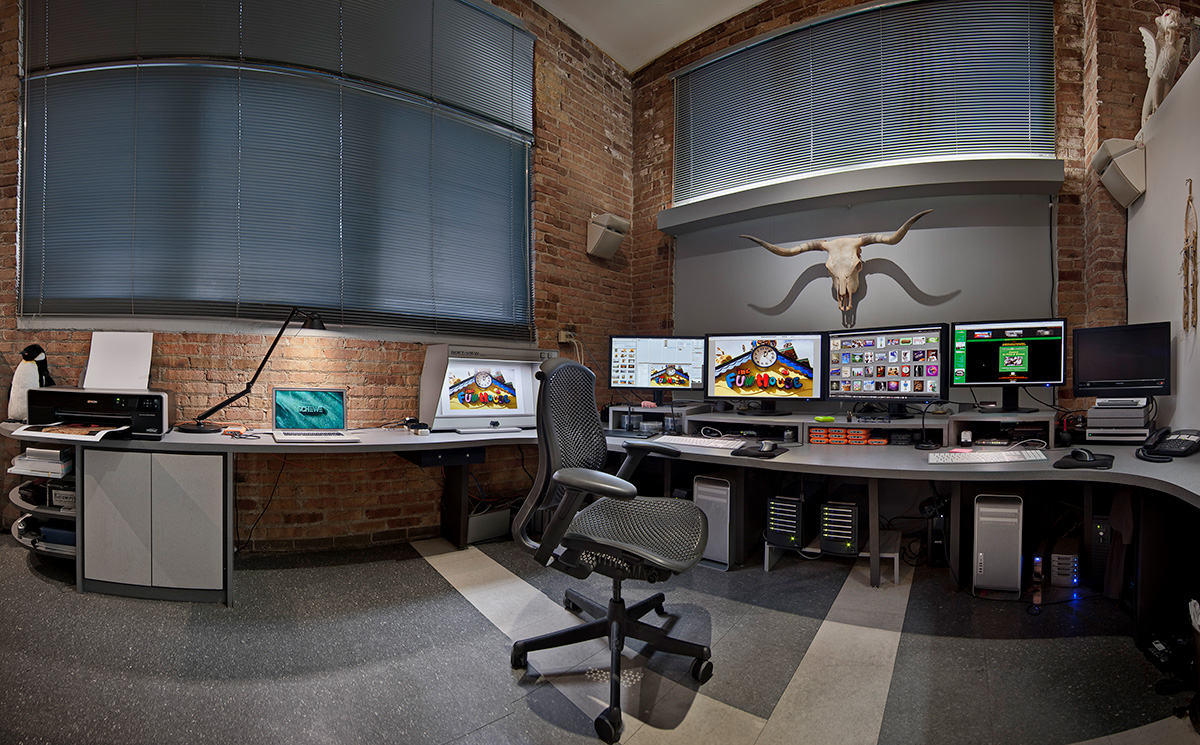
On the left of the main displays is a GTI viewing booth camped for D65 and left of that is a task lamp with SoLux 47K bulbs (which are a bit too warm). I chose to lamp the viewing booth with D65 because the original D50 make the prints too warm.

Also note that my imaging area is quite bright...after a decades of working with dim CRT displays in a cave, I now work with a much brighter room lighting and run my LCD displays much brighter–currently running at 160cd/m2 with both native white balance (measured about 6600K) with a Monitor Native Gamma (close to 2.3 or so) and I'm running the NEC PA302W at Native (FULL) color gamut (prolly about 98% of Adobe RGB).

I also use the digital dimmer on the GTI light box to reduce the brightness of the lighting to match the white brightness of the display so that the soft proofed paper white (using the profile) matches (approx.) the actual final printed paper white.

All told this makes for a very, accurate soft proofing environment so I can not only match but improve my images when making final prints...and truth be told, I'll often go back to my master RGB images and fiddle with them to look as good as the prints :~)
Logged

LeonD

  • Jr. Member
  • **
  • Offline Offline
  • Posts: 89
Re: Soft Proofing Techniques
« Reply #7 on: February 22, 2018, 09:02:00 am »


Yes, all the tutorials seem to be about matching the original image before soft proofing but what I really use soft proofing for these days is how to adjust the image to look as good as possible with the ink/paper combination. Soft proofing allows me to tweak the image to get the best print possible regardless of where it may have started......


Based on the above then, assuming you know the type of paper you'll be using, why not use soft proofing from the start?
Logged

Mark D Segal

  • Contributor
  • Sr. Member
  • *
  • Offline Offline
  • Posts: 12512
    • http://www.markdsegal.com
Re: Soft Proofing Techniques
« Reply #8 on: February 22, 2018, 09:09:34 am »

Based on the above then, assuming you know the type of paper you'll be using, why not use soft proofing from the start?

Referring to your quote from Jeff, as well as my conclusion in Reply #4 (But in the final analysis, what matters most in this exercise is the combination of settings that produces the most satisfactory softproof in the mind of the user, and we only know this by testing the options and observing the impacts), my answer to your question would be: yes indeed, why not? This is how I work. Most of my output is on Ilford Gold Fibre Silk or similar, but if I wish to see how the image would print on a matte media, I'd make a virtual copy of the photo and change the softproof condition to the paper I may wish to try, then amend the image edits accordingly to produce under softproof what I think would be the best looking photo for that paper. I've demo'd this approach in a number of my reviews for this website.
Logged
Mark D Segal (formerly MarkDS)
Author: "Scanning Workflows with SilverFast 8....."

LeonD

  • Jr. Member
  • **
  • Offline Offline
  • Posts: 89
Re: Soft Proofing Techniques
« Reply #9 on: February 22, 2018, 09:18:30 am »

When using Lightroom, comparisons between the original and the soft proof were straightforward.

I now use Capture One and these comparisons are not nearly as convenient.  This is what started me thinking, if ultimately I want the "soft proof" to look good and I can't really compare the before and after, why not just do the whole process with the "soft proof"?

Thanks for the confirmation.
Logged

digitaldog

  • Sr. Member
  • ****
  • Offline Offline
  • Posts: 20651
  • Andrew Rodney
    • http://www.digitaldog.net/
Re: Soft Proofing Techniques
« Reply #10 on: February 22, 2018, 12:37:42 pm »

Well, nobody has said the obvious that for me, soft proofing is NOT used to match the image before soft proofing but to evaluate the image and how it will look on the printer and media of choice.
I probably wasn't totally clear when writing earlier: Soft proofing is all about a close(er) visual match between the output and what you see on the display so display calibration is super critical.
Logged
http://www.digitaldog.net/
Author "Color Management for Photographers".

digitaldog

  • Sr. Member
  • ****
  • Offline Offline
  • Posts: 20651
  • Andrew Rodney
    • http://www.digitaldog.net/
Re: Soft Proofing Techniques
« Reply #11 on: February 22, 2018, 12:41:17 pm »

Based on the above then, assuming you know the type of paper you'll be using, why not use soft proofing from the start?
Couple reasons:


1. Until you fully edit the image, what Rendering Intent will you select? That's the first task for soft proofing! To simulate on-screen, how the image should appear when printed when everything is setup ideally. With that specific profile and it's specific behavior of rendering intents.
2. When apply output specific edits based on the paper profile and now selected rendering intent? Better: edit the image as you desire in your RGB working space and that's your master archive for any output today and in the future. Then soft proof, pick RI, produce output specific edits that are NOT burned into the master!
3. You end up with a newer, better output profile; now what? You've painted your data into a corner.
Logged
http://www.digitaldog.net/
Author "Color Management for Photographers".

Mark D Segal

  • Contributor
  • Sr. Member
  • *
  • Offline Offline
  • Posts: 12512
    • http://www.markdsegal.com
Re: Soft Proofing Techniques
« Reply #12 on: February 22, 2018, 01:30:08 pm »

Couple reasons:


1. Until you fully edit the image, what Rendering Intent will you select? That's the first task for soft proofing! To simulate on-screen, how the image should appear when printed when everything is setup ideally. With that specific profile and it's specific behavior of rendering intents.
2. When apply output specific edits based on the paper profile and now selected rendering intent? Better: edit the image as you desire in your RGB working space and that's your master archive for any output today and in the future. Then soft proof, pick RI, produce output specific edits that are NOT burned into the master!
3. You end up with a newer, better output profile; now what? You've painted your data into a corner.

With Lightroom, the application is so flexible and so non-destructive that the order with which one approaches these things really isn't super-critical, so there's not much worth debating about in this context. The cake will come out baked pretty much the same regardless of the order in which you drop the ingredients into the bowl. As for Rendering Intent, I have no problem starting with the one I know I'll end-up with most of the time, which is RelCol. I'll do all my edits on that assumption, but depending on what I see, I may test Perceptual. It's
 a mouse-click. If see merit to that option, I may then need to go back and tweak a slider or two - a bit. So no big deal here. With LR edits are never burned into a master. They're just a history track that one can amend at will. Likewise with profiles. Sometimes I'm naughty and test a profile for another paper if I think it may have properties better suited to the photo. Often the edits it entails are trivial, but if they are substantial, create a virtual copy and edit-away. It's pretty much a free-lunch. Now, if we were talking about destructive or irreversible editing processes that do get baked into the original file (but one can always work to avoid that by keeping an unworked or raw master), totally different scenario and different approach, where Andrew's concerns would be much more relevant.
Logged
Mark D Segal (formerly MarkDS)
Author: "Scanning Workflows with SilverFast 8....."

digitaldog

  • Sr. Member
  • ****
  • Offline Offline
  • Posts: 20651
  • Andrew Rodney
    • http://www.digitaldog.net/
Re: Soft Proofing Techniques
« Reply #13 on: February 22, 2018, 01:39:35 pm »

With Lightroom, the application is so flexible and so non-destructive that the order with which one approaches these things really isn't super-critical, so there's not much worth debating about in this context. The cake will come out baked pretty much the same regardless of the order in which you drop the ingredients into the bowl.
Perhaps. You still have to decided upon a rendering intent from the get go. It's super pointless to pick say Perceptual, make output specific edits based on that, then then switch to RelCol. Just as it would be pointless to create output specific edits for paper A then use paper B's profile.
Quote
As for Rendering Intent, I have no problem starting with the one I know I'll end-up with most of the time, which is RelCol.
Ditto but I still have to toggle it on and see if I prefer it or Perceptual. Using Photoshop, Saturation is fair game too. But you will never know until you toggle all the options. There's simply no way I'd apply and output specific edit until I completely decided to move forward with a selected RI. So I have to check first, for every image, then edit based on that appearance.
Quote
Often the edits it entails are trivial, but if they are substantial, create a virtual copy and edit-away.
In LR, that's the only option you have IF you invoke a soft proof then start editing. And that you are forced to do so backs up my points about selecting the profile and RI, then move forward with edits based on both.
Quote
Now, if we were talking about destructive or irreversible editing
It's more about wasting time, making edits that are not based on the RI. Nearly impossible to invoke destructive or irreversible editing in LR at least from raw data. But you can certainly jump down a rabbit hole of editing that ends up a waste of time if you don't plan the editing 'carefully'. I suppose not doing so is a good workflow if you charge by the hour, but many of us want to start editing with minimal time wasted, non destructive or not.
Logged
http://www.digitaldog.net/
Author "Color Management for Photographers".

Mark D Segal

  • Contributor
  • Sr. Member
  • *
  • Offline Offline
  • Posts: 12512
    • http://www.markdsegal.com
Re: Soft Proofing Techniques
« Reply #14 on: February 22, 2018, 01:57:03 pm »

This is really a chicken-egg business so it's not worth arguing about. Whether one settles on the RI first or last is hardly an issue I'd stake my life on Andrew because the impact of the image edits can easily dwarf the impact of the RI changes. Perceptual may work better for photos with heavily OOG colours, while RELCOL may be preferable otherwise, but that's initial guidance and one can start with it. To really know which RI is preferable one needs to optimize the edits for each of them anyhow. Can't think of how many thousands of photos I've edited in Lr since the app first appeared and my workflow is pretty efficient doing what I'm suggesting here because I largely know what I'm doing - what I start with and what I expect to end with. If you try to predetermine too much before you start editing, that can end-up being quite a time waster. I don't think either of these approaches are necessarily more time consuming than the other. And creating virtual copies isn't the only option for making big changes. One can scratch the history and re-edit the original file if one wanted to in Lr, or one can keep the history and tweak a few settings as appropriate. But each to his/her own. I'll repeat - not an issue worth arguing about.
Logged
Mark D Segal (formerly MarkDS)
Author: "Scanning Workflows with SilverFast 8....."

digitaldog

  • Sr. Member
  • ****
  • Offline Offline
  • Posts: 20651
  • Andrew Rodney
    • http://www.digitaldog.net/
Re: Soft Proofing Techniques
« Reply #15 on: February 22, 2018, 02:07:21 pm »

This is really a chicken-egg business so it's not worth arguing about.
Who's arguing? I made some points about when to pick an RI via soft proofing then when to begin editing the color appearance based on that selection. Where's the debate in picking the RI when it's time to pick it for output, rather than at the very beginning of the editing process as I've proposed. Which do you believe, based on working on image files would be the least time consuming?
Quote
Whether one settles on the RI first or last is hardly an issue I'd stake my life on Andrew because the impact of the image edits can easily dwarf the impact of the RI changes.
Do you believe and do you wish your readers to believe that there's no impact on one's time spent editing an image?
Quote
Perceptual may work better for photos with heavily OOG colours, while RELCOL may be preferable otherwise, but that's initial guidance and one can start with it.
No need to go deeper than explaining these facts: The RI one selects should be based on the appearance the image creator prefers. The OOG color stuff isn't even worth mentioning IF you examine image gamut versus output gamut using a 3D gamut map: time consuming and not at all necessarily if your goal is to edit an image and make a print! Just view the soft proof using various RI's and pick the one you like. Done.
Quote
To really know which RI is preferable one needs to optimize the edits for each of them anyhow.
To know one has to view the three options (or two in LR). That's my point. That's job #1. Until you decided on an RI using a soft proof, you can't edit the image via the soft proof! I don't know how to make it any easier to follow. And it's utterly pointless to do so at the beginning of the editing in an RGB working space which is OUTPUT AGNOSTIC by design. A color space designed for editing images not based on any output device.
Quote
If you try to predetermine too much before you start editing, that can end-up being quite a time waster.
Exactly my point! Do not predetermined stuff to early in the editing process; like picking a soft proof before doing the heavy lifting on the master archive in an RGB working space designed for editing and archiving images without output being defined.
Quote
I don't think either of these approaches are necessarily more time consuming than the other.
Editing based upon an RI you will not use is time consuming. And pointless.
Logged
http://www.digitaldog.net/
Author "Color Management for Photographers".

praja343

  • Full Member
  • ***
  • Offline Offline
  • Posts: 137
Re: Soft Proofing Techniques
« Reply #16 on: February 22, 2018, 02:40:39 pm »

I forgot to mention that I calibrate the monitor a couple of times a month though using the Colormunki photo and not one of the more expensive ones. I print a nozzle check pattern on my 3880 before printing  to ensure that the heads are fine. I wish I had Jeff Schewe's imaging room even though it is a couple of years old (hint, hint) and I do look at the print in under a lamp at 6500K.

It takes a couple of iterations (sometimes a couple more) before I am happy with the print - I now try different RIs based on this discussion. By then the monitor image does look unappealing  - but who cares because the print looks good. I was trying to decrease the number of iterations  by matching the "problem" parts of the image between the soft proof and the monitor and letting the other parts fall where they may. I do have different presets for different kinds of paper for brightness, contrast and saturation (mostly the variables I change to proof) and pick and hope for the best or reiterate.

I have learnt from your answers; Mark Segal, Andrew Rodney and Jeff Schewe (along with Wayne Fox) have helped me progress along my path a few times before since this is a learn by doing kind of a thing for me.

To appropriate a quote from a politician of the past, "It is the (way) print (looks) stupid". So I will try and improve my visual examination skills and not worry too much about RGB values in different parts of the image while proofing.

A tip of the hat to the three of you (Jeff, I can send you a PM with my address if you are throwing any parts of your "old" viewing room. I will pay the shipping :)). Thanks.
Logged

digitaldog

  • Sr. Member
  • ****
  • Offline Offline
  • Posts: 20651
  • Andrew Rodney
    • http://www.digitaldog.net/
Re: Soft Proofing Techniques
« Reply #17 on: February 22, 2018, 02:49:42 pm »

I forgot to mention that I calibrate the monitor a couple of times a month though using the Colormunki photo and not one of the more expensive ones.
Lesser expensive options provide crippled software, and calibration once a month should be fine with a modern LCD.
Quote
I now try different RIs based on this discussion. By then the monitor image does look unappealing  - but who cares because the print looks good.
Not ideal; the idea with soft proofing along with ideal display calibration is WYSIWYG (within reason, differences between emissive displays and reflective prints (where the illuminant plays a major role). With the simulate check boxes on, when in full screen mode (no white from the GUI), the soft proof and print should match closely, which isn't what you're reporting.
Maybe this will help conceptually even if you're not using PS:

Soft proofing in Adobe Photoshop CC
In this 33 minute video, I'll cover soft proofing in Adobe Photoshop CC:
What is sof proofing.
Setting up a soft proof.
Saving soft proof presets.
What the simluate ink and paper check boxes do, why to use them.
Making output specific edits in layer sets.
Working with soft proofing in full screen mode.
The Out of Gamut Overlay and why to ignore it.


High resolution: http://digitaldog.net/files/SoftProofingInPhotoshopCC.mp4
Low resolution (YouTube): https://www.youtube.com/watch?v=njFgYba3lHU&feature=youtu.be


This is older and more specific to LR but I'd view the video above first:
http://digitaldog.net/files/LR4_softproof2.mov
Logged
http://www.digitaldog.net/
Author "Color Management for Photographers".

Mark D Segal

  • Contributor
  • Sr. Member
  • *
  • Offline Offline
  • Posts: 12512
    • http://www.markdsegal.com
Re: Soft Proofing Techniques
« Reply #18 on: February 22, 2018, 02:59:13 pm »

Who's arguing? I made some points about when to pick an RI via soft proofing then when to begin editing the color appearance based on that selection. Where's the debate in picking the RI when it's time to pick it for output, rather than at the very beginning of the editing process as I've proposed. Which do you believe, based on working on image files would be the least time consuming? Do you believe and do you wish your readers to believe that there's no impact on one's time spent editing an image? No need to go deeper than explaining these facts: The RI one selects should be based on the appearance the image creator prefers. The OOG color stuff isn't even worth mentioning IF you examine image gamut versus output gamut using a 3D gamut map: time consuming and not at all necessarily if your goal is to edit an image and make a print! Just view the soft proof using various RI's and pick the one you like. Done. To know one has to view the three options (or two in LR). That's my point. That's job #1. Until you decided on an RI using a soft proof, you can't edit the image via the soft proof! I don't know how to make it any easier to follow. And it's utterly pointless to do so at the beginning of the editing in an RGB working space which is OUTPUT AGNOSTIC by design. A color space designed for editing images not based on any output device. Exactly my point! Do not predetermined stuff to early in the editing process; like picking a soft proof before doing the heavy lifting on the master archive in an RGB working space designed for editing and archiving images without output being defined. Editing based upon an RI you will not use is time consuming. And pointless.

OK, not arguing - discussing.

I'll just make two further observations on this:

(1) Rendering Intent is all about how OOG colours are handled and what impact the chosen Intent has further on in-gamut colours. For the most part I use wide-gamut papers so prefer RelCol as a starting point and more often than not it is also the end point. If I see issues that Perceptual may handle better, it's a mouse-click to find out, and if the change in RI calls forth tweaking a slider or two, that happens real fast. Not an issue.
(2) I need to edit the image to put it into near final shape, before I can know with confidence which RI is going to look better for that image. Often, the changes induced by an RI switch are subtle compared with the changes induced by editing. The optimal choice is image-dependent and what the image looks like depends a lot on how it's edited, so it is a bit of chicken-egg business and whether you start with the chicken or the egg, the time spent isn't going to differ much, if at all, depending on how one works and how well one knows the application one is working with.

I'll leave it at that. I think we all understand the choices and their workflow implications.
Logged
Mark D Segal (formerly MarkDS)
Author: "Scanning Workflows with SilverFast 8....."

digitaldog

  • Sr. Member
  • ****
  • Offline Offline
  • Posts: 20651
  • Andrew Rodney
    • http://www.digitaldog.net/
Re: Soft Proofing Techniques
« Reply #19 on: February 22, 2018, 03:07:27 pm »

(1) Rendering Intent is all about how OOG colours are handled and what impact the chosen Intent has further on in-gamut colours.
There's more to RI than just that. As you know, every color value is converted, converted differently and converted without any idea about adjacent pixels. So we humans need to view all the color values in context so they appear to us as an image, not a huge pile of numbers going from one triplet to another. Hence, and again, soft proofing is about color appearance and one has to start by picking the RI they visually prefer and OOG is then handled just like non OOG colors. Least we forget people editing on displays who's gamuts are far smaller in many areas of color space than the printer. The proof then becomes the print (the print becomes that proof).
Quote
I need to edit the image to put it into near final shape, before I can know with confidence which RI is going to look better for that image
Exactly! And I stated that. So you're doing this in an RGB working space which is output agnostic by design.
And yes! Some images after soft proofing don't require any further editing. But you need to get the image into a state it's even worth viewing with a soft proof, and only then can you decide what RI to select. So going full circle, this is why it's not a good idea to do the following: assuming you know the type of paper you'll be using, why not use soft proofing from the start?
Quote
I think we all understand the choices and their workflow implications.
Some do, some don't. If everyone did, no need for the forums no need for the questions/answers.
Logged
http://www.digitaldog.net/
Author "Color Management for Photographers".
Pages: [1] 2   Go Up